.jpg)
.jpg)
TIPS !!
1. Perfect water level (nice and precise horizontal line !)
In any vessel add water and a few drops of dish cleaning liquid. Shake and let rest for 1 min.
2. Approximate value reminder
(with single picture taken with single hand
in the fields, montain ... especially useful for remembering hyper 3D base)
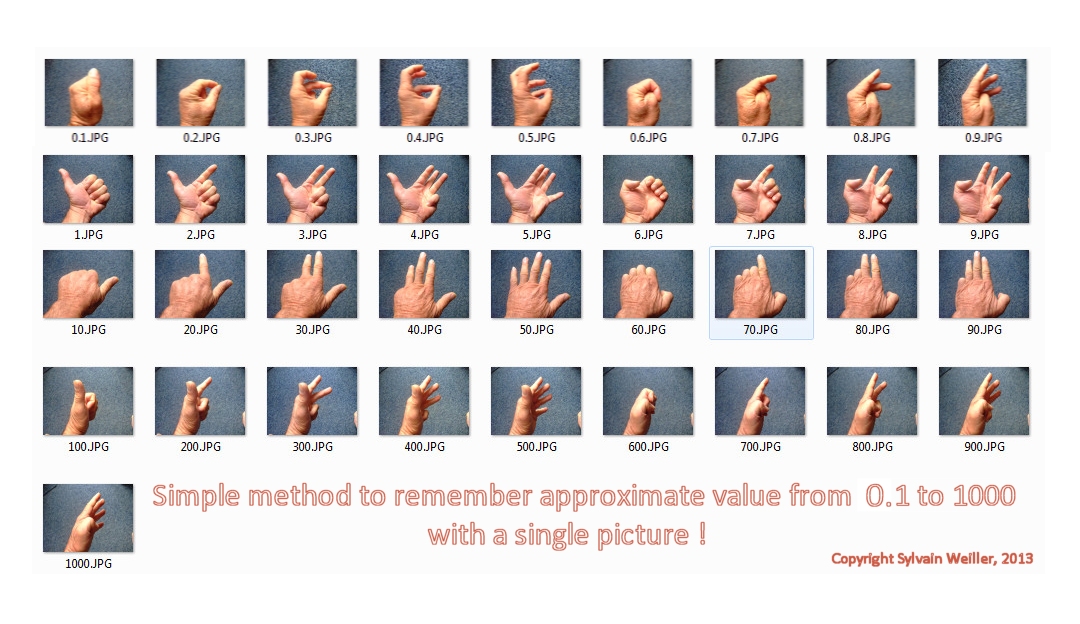
3. *.SER files repair
In case you recorded a .SER file and space disk went to 0 the number of
frames is not written in the SER file.
You can repair by putting a reasonable number as shown. Estimate number of frame
like this :
A) In 16 bit format (SizeOfFile in bytes - 178*** ) / 597 033 ...
*** 178 dec, 0xB2, is start of data
My case : 120 601 KB --> 202 Frm hexa CA00 ....
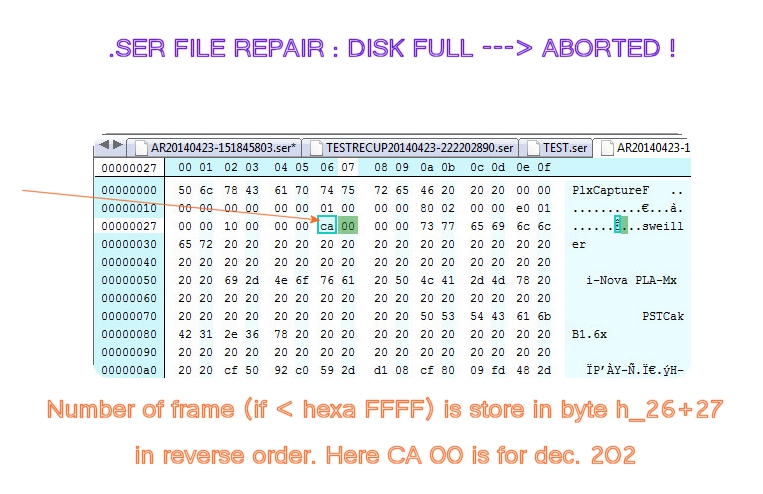
B) In 8 bit format (SizeOfFile in bytes -
See also :
http://www.grischa-hahn.homepage.t-online.de/astro/ser/SER%20Doc%20V2.pdf
4. Recover software screen lost on invisible
part of your desktop
(happens for example after I-Display use and no more screeen sharing)
Bring the application into focus (ex. Alt-Tab) then press ALT-SPACE then M then move the unseen application with left or right keys to bring it back to the visible desktop ! Finally hit RETURN when Ok.
5. How to be able to upload / download and view an animated GIF from a dropbox.com shared link ?
I made a 2.5 FPS GIF animation, robin.gif.
I could upload it to dropbox but
when I made a link to share it
https://www.dropbox.com/s/ic3y0rkgdm28yi6/Robin.gif?dl=0 (dl=1 does not solve)
Opening the link only showed the first image of the animation, too bad !
So I tried to upload the gif file into dropbox with extension .anim (robin.anim)
and shared a new link ...
Now when you download from this link ...
https://www.dropbox.com/s/mmmntl4capdwltb/Robin.anim?dl=1
... on your computer, rename the 6.41 Mo file robin.anim to robin.gif
... It will open as animation with
either Irfanview, IE , etc !! SOLVED !
6. Latest Windows10.ISO
file is
too
large for a single sided standard 4.7GB DVD Installation !
How to easily create an edited
.ISO
which will fit on a standard DVD ?
Summary of my Method (UltraISO, Quick and Hassle-Free):
Download UltraISO Premium Edition eg. V9.7.6.9860 (free Trial mode).
Download then open the official Windows10.ISO into UltraISO.
Delete everything in the Sources folder except boot.wim (~439 MB).
Save as a new ISO called WINBOOTISO.iso.
Burn the ISO on DVD (maybe would work on CD but not tested) and test the boot
(via BIOS and restart).
If all is Ok, the standard Windows 10 setup appears after ~2 minutes.
Bonus: This UltraISO Trial allows bit more than 300 MB, so no activation is
needed
for this modification !
If needed the extracted structure / folders / files of the original Windows10.ISO
can be later accessible via a USB key, internal HD, etc...
7. FULL
PROTOCOL
FOR RESTORING AN “UNALLOCATED” PARTITION USING LINUX
Comprehensive Guide for Recovering a Lost Partition with TestDisk
=================================================================
*/
1. INTRODUCTION
---------------
When an external drive (SSD/HDD) appears as “unallocated” in Windows,
it usually means the partition table is damaged.
The data is often still present, but Windows refuses to mount the disk.
Linux, combined with TestDisk, allows you to:
- detect lost partitions
- verify their contents
- restore the partition table
- recover a fully functional disk
This guide provides a complete, reliable, and reproducible procedure.
2. REQUIREMENTS
---------------
- A PC running Linux (Ubuntu, Kubuntu, Mint…)
- OR a Linux Live USB (Ubuntu recommended)
- The external drive to repair
- Internet connection (to install TestDisk)
3. BOOT INTO LINUX
------------------
Two options:
3.1 Installed Linux
- Boot normally into your Linux system.
3.2 Linux Live USB
- Insert the USB stick containing Ubuntu (or another live distro).
- Boot the PC from the USB stick.
- Choose “Try Ubuntu” (or equivalent) to run Linux without installing.
4. OPEN A TERMINAL
------------------
Depending on your desktop environment:
4.1 KDE (Kubuntu, KDE Neon, etc.)
- Press the Super (Windows) key.
- Type: Konsole
- Launch “Konsole”.
4.2 GNOME (Ubuntu standard)
- Press the Super key.
- Type: Terminal
- Launch “Terminal”.
5. INSTALL TESTDISK
-------------------
In the terminal, run:
sudo apt update
sudo apt install testdisk
- Enter your session password if prompted (nothing appears while typing).
- Press Enter.
- Confirm installation if asked (type “y” then Enter).
6. RUN TESTDISK
---------------
In the terminal:
sudo testdisk
TestDisk opens in text mode inside the terminal.
7. TESTDISK PROCEDURE
----------------------
7.1 Create a log
- At the initial screen, TestDisk shows:
[Create] [Append] [No Log]
- Select: Create
- Press Enter.
7.2 Select the disk
- TestDisk lists all detected disks.
- Identify the external disk (e.g., 2000 GB / 2 TB).
- Do NOT select your system disk (usually /dev/sda).
- Select the external disk.
- Press Enter.
7.3 Select the partition table type
- TestDisk usually auto-detects:
- EFI GPT (for modern disks, often > 2 TB)
- Intel (MBR) for older disks
- Keep the default choice.
- Press Enter.
7.4 Start analysis
- Select:
Analyse
- Press Enter.
- Then select:
Quick Search
- Press Enter.
TestDisk begins scanning for lost partitions.
8. VERIFY THE FOUND PARTITION
-----------------------------
When TestDisk finds a partition:
- Highlight the partition (e.g., HPFS - NTFS, exFAT, etc., with size close
to the disk capacity).
- Press the P key (uppercase) to list files.
If:
- You see your folders and files,
THEN:
- This is the correct partition.
Press q to return to the previous screen.
9. RESTORE THE PARTITION
------------------------
If TestDisk shows the option:
[Write]
Then:
9.1 Restoration steps
- Select: Write
- Press Enter.
- TestDisk asks for confirmation.
- Type: Y
- Press Enter.
TestDisk writes the new partition table to the disk.
9.2 Exit TestDisk
- Press q several times to exit.
- Close the terminal if desired.
10. RESTART THE DRIVE
---------------------
After writing the partition table:
- Safely unplug the external drive.
- Plug it back in.
Expected result:
- The drive appears again in Linux (Dolphin, Nautilus, etc.).
- The drive also appears in Windows.
- All folders and files are accessible as before.
11. IF “WRITE” DOES NOT APPEAR
------------------------------
If, after Quick Search, TestDisk does NOT show [Write]:
- Run a deeper analysis:
Deeper Search
- Press Enter.
This deeper scan takes longer but may find additional partitions or a cleaner version of the lost one.
After the scan:
- Select the found partition.
- Press P to verify file presence.
- If files look correct:
- Press q to return.
- If [Write] appears, follow the restoration procedure (section 9).
12. FINAL VERIFICATION
----------------------
After restoring the partition and reconnecting the drive:
12.1 Check data access
- Open your file manager (Dolphin, Nautilus…).
- Open the drive.
- Confirm that folders and files are readable.
12.2 Check disk health (SMART)
Optional but recommended, especially if the issue followed sudden disconnections
or errors.
In the terminal:
sudo apt install smartmontools
sudo smartctl -a /dev/sdX
(Replace X with the disk letter, e.g., sdb)
- Check for excessive bad sectors or critical errors.
13. PREVENTION TIPS
-------------------
To avoid future “unallocated” partition issues:
- Always safely eject USB drives before unplugging.
- Avoid unplugging during file transfers.
- Use high-quality USB cables and hubs.
- Make regular backups of important data.
- Periodically check disk SMART status (especially for portable external drives).
14. CONCLUSION
--------------
The Linux + TestDisk protocol is:
- free
- powerful
- stable
- non-destructive (when used correctly)
- often more effective than Windows tools, especially when the disk appears
as “unallocated”.
It allows you to:
- recover a lost partition
- verify that files are intact
- restore the partition table
- make the disk readable again in both Linux and Windows.
----------------
*/
1999 - 2026 Sylvain Weiller. All rights reserved |See Term of Use |