v1.7 *** *** 2025/07/15
© 2025, Sylvain Weiller
Always type CTRL-F5 to charge latest version !
SolarGun
v1.7 *** *** 2025/07/15
© 2025, Sylvain Weiller
Always type CTRL-F5 to charge latest version !
**Introduction** As the name suggests, this custom-made Delphi Embarcadero application processes monochrome solar images with lightning-fast speed! Its primary purpose is to enhance H-alpha images, particularly those with a high dynamic range (10 .. 16 bit), but it can also be applied to other wavelengths (with support for three customizable user palettes). The entire workflow, including calculations and colorization, is self-contained—no external image processing software is required. The process is straightforward: your only task is to position three points with pixel precision on the solar limb. Always do it on the last interior not ~black pixel. From there, the application handles the rest, allowing you to explore various settings and customize the final appearance to your liking. Once your preferred configuration is set, creating a new image takes just seconds! The results are versatile, producing black-and-white or colorized images that beautifully showcase the solar disk and prominences in high resolution JPG, PNG and BMP. After more than 200 hours of development and testing, I’m thrilled to now share version 1.7 with my friends and the broader community. Feel free to reach out via email for any questions, issues, or suggestions.
No installation is required!
|
New in V 1.7 Batch
colorization has been much improved and optimized with options of
Corono aspect, stretch and gamma! Also a text box replaces disturbing
CMD
instructions.
|
| Version 1.7 Panel .... See new functions: Separated Gamma functions for right and left images, manual Progressive Gamma with nice default values, 'X' to interrupt batch colorization, Corono button, better 'Update' panel. |
 |
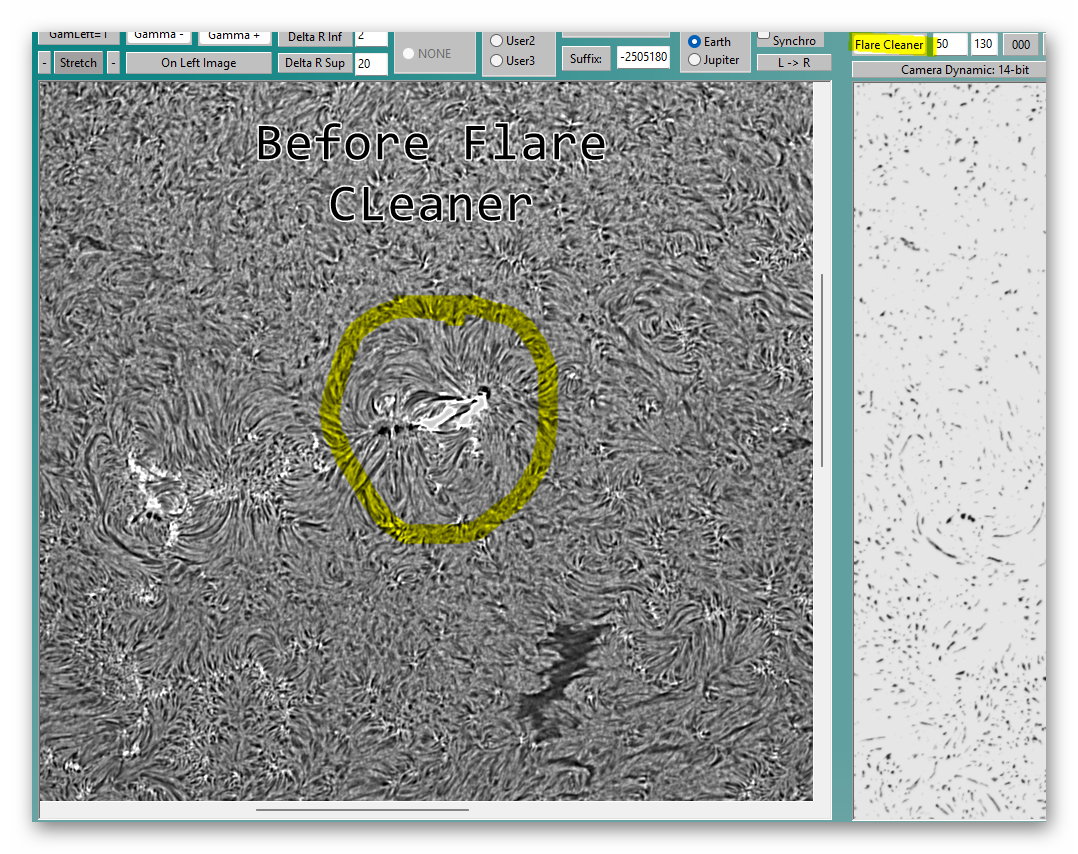
| Flare Cleaner ... This function is much better than older "SWF-SolarWhiteFlares V1.5" software! Sometimes after convolution in Autostakkert or other softwares, the center of flares get an incorrect value and iss not showing white. Flare Cleaner will correct this flaw on the left, source image and is available just after loading it... Two parameters are available (use trial and error and UNDO Left, to optimize them): -Min size (here 50 pixels square). It means all surfaces below 50 pixels will not be affected. Entiere values from +1. -Threshold luminosity (here 130) is used to select more or less features (values 1 .. ~200). On the right there is a label (here at 000). it will show the computed final value ... This step will briefly echo in red. Examples Before / After below... |
 |
 |
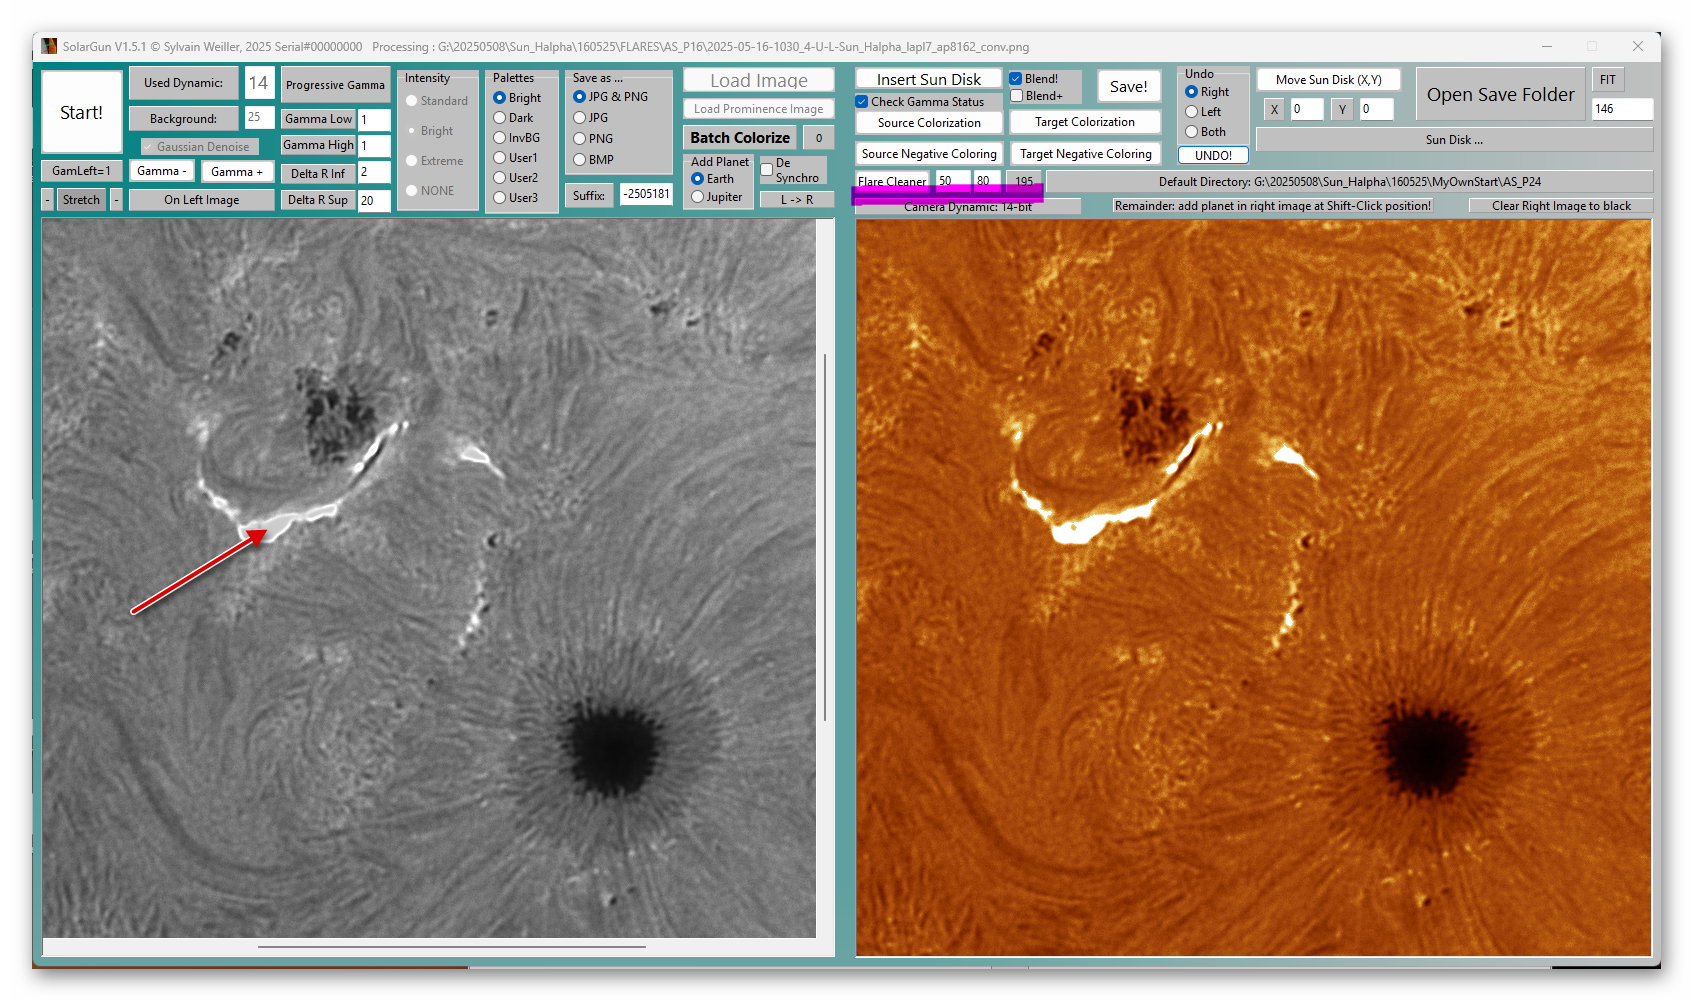
| Other example ... (left image shown
here after Undo Left!) Arrow points on 'not white' flare interior zone. In this case Threshold luminosity has been reduced until satisfied! |
 |
| Blend+ |
| This function can be useful some times
to better fuse the left selected circle in to the low level right image
... Give it a try. Uncheck Blend first. |
 |
 |
 |
| UNDO |
| Improved as you can now select Left, Right or Both images then click UNDO. |
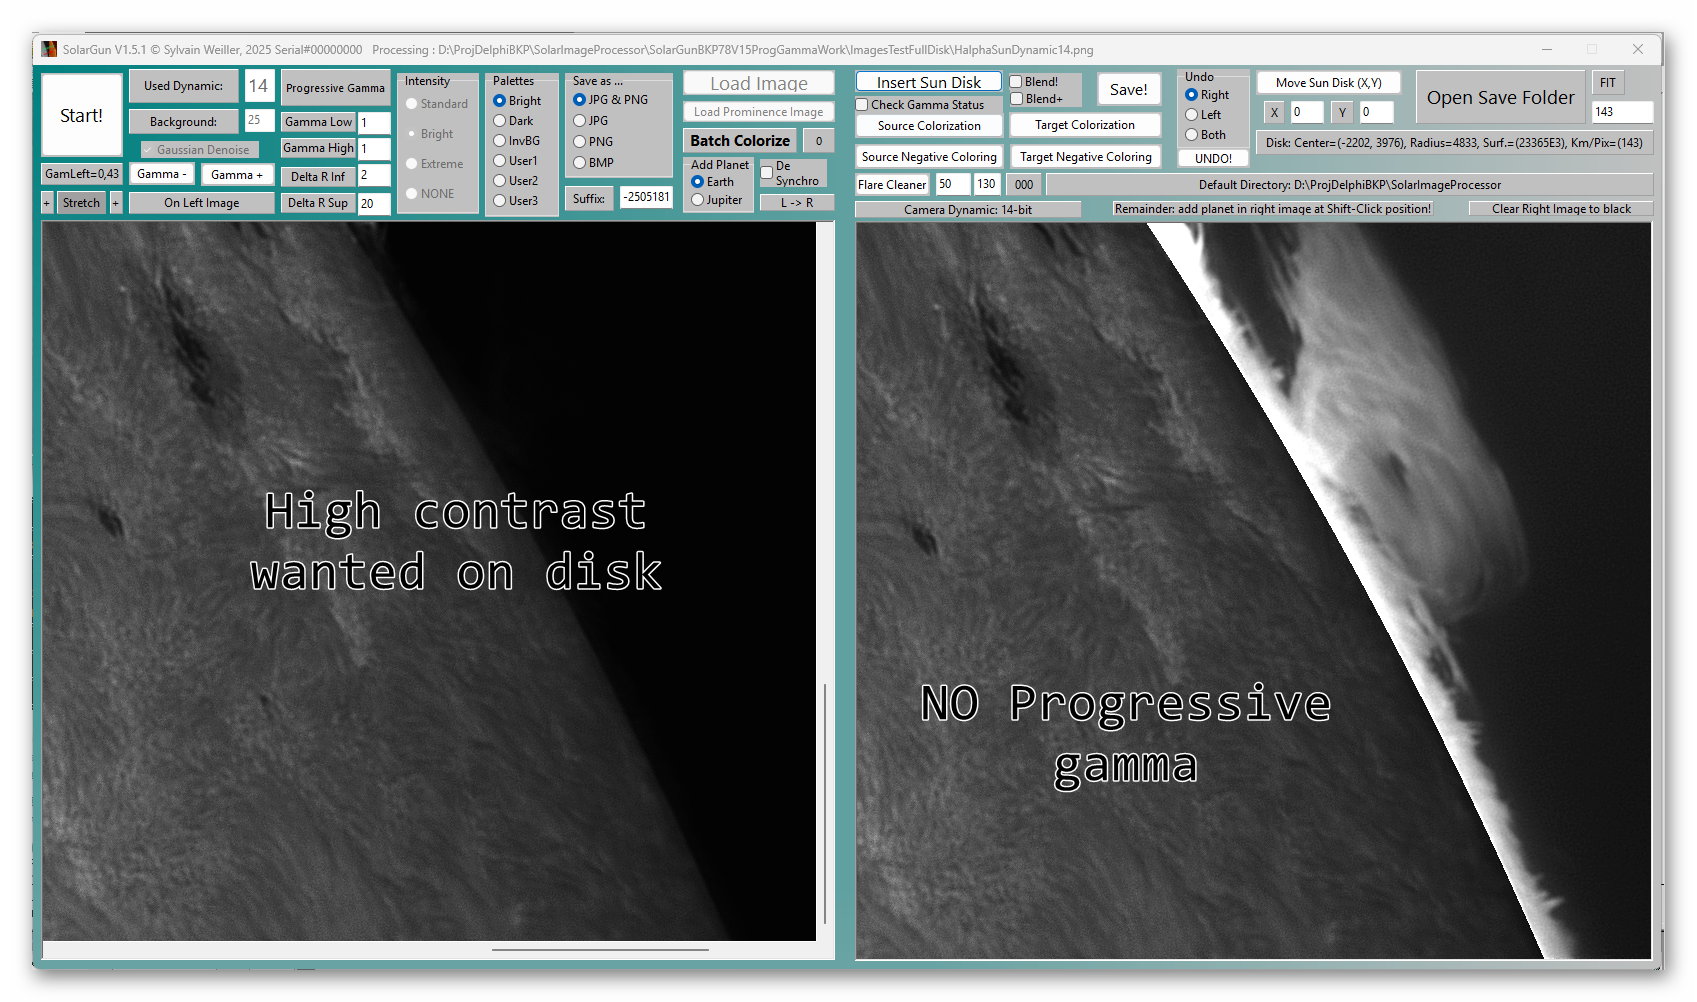
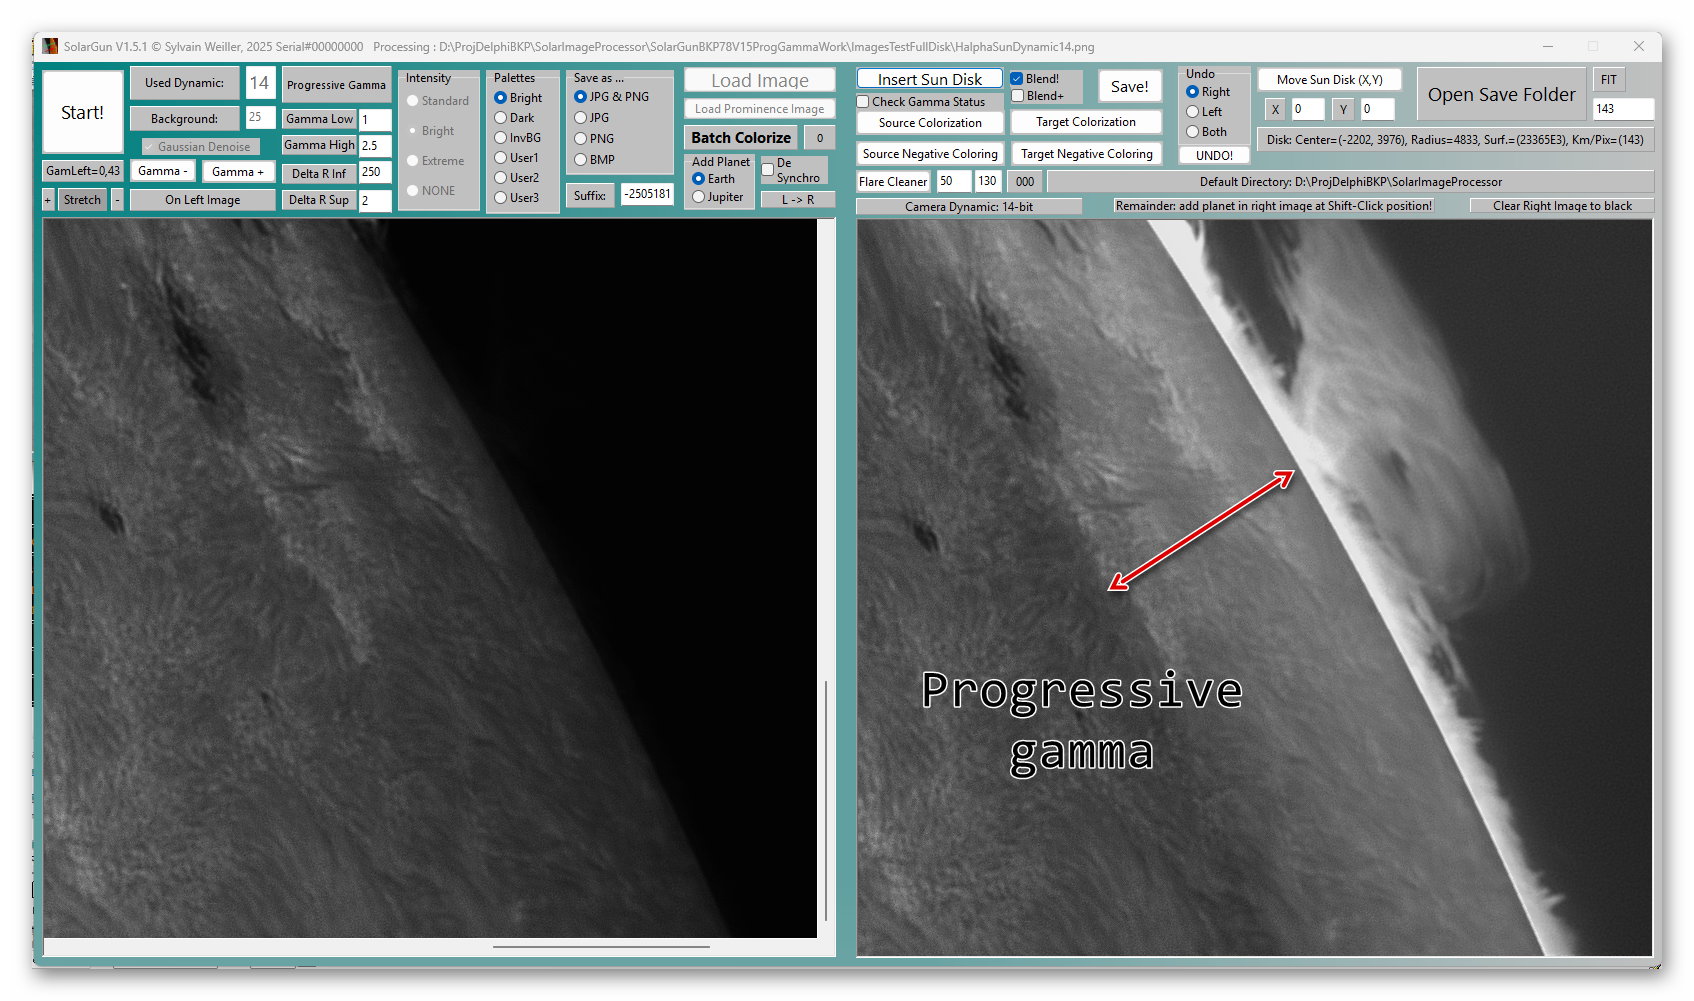
| Progressive Gamma You can now in some difficult situation apply a progressive gamma beetwen to radial limits on the left, source image. This can improve your results as shows the example below ... |
 |
 |
| Stretch and Gamma They can be applyed at will, separately on Left and Right images. Just click on 'On Left Image' or 'On Right Image' to switch. |
|
| Features already present in OLDER VERSIONS ... |
| New important tools from v1.4! |
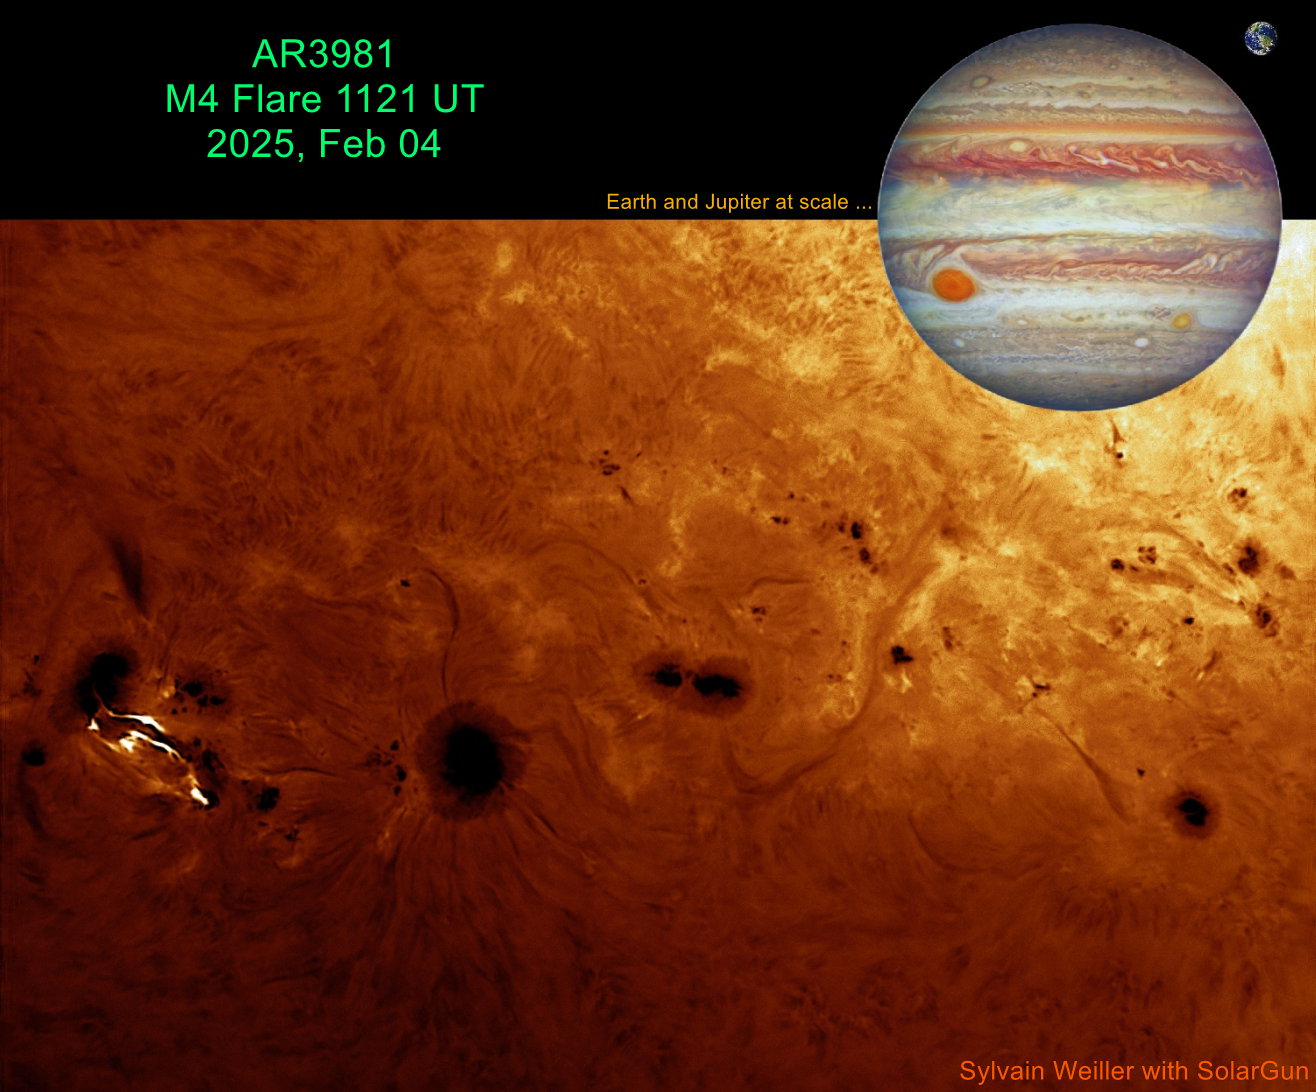 |
If it was easy with v1.3 to add Earth
or Jupiter images on pictures with a visible Sun's limb, there was
no way to do it on a large sunspot in the middle of the solar disk
like in this just published picture above!
|
 |
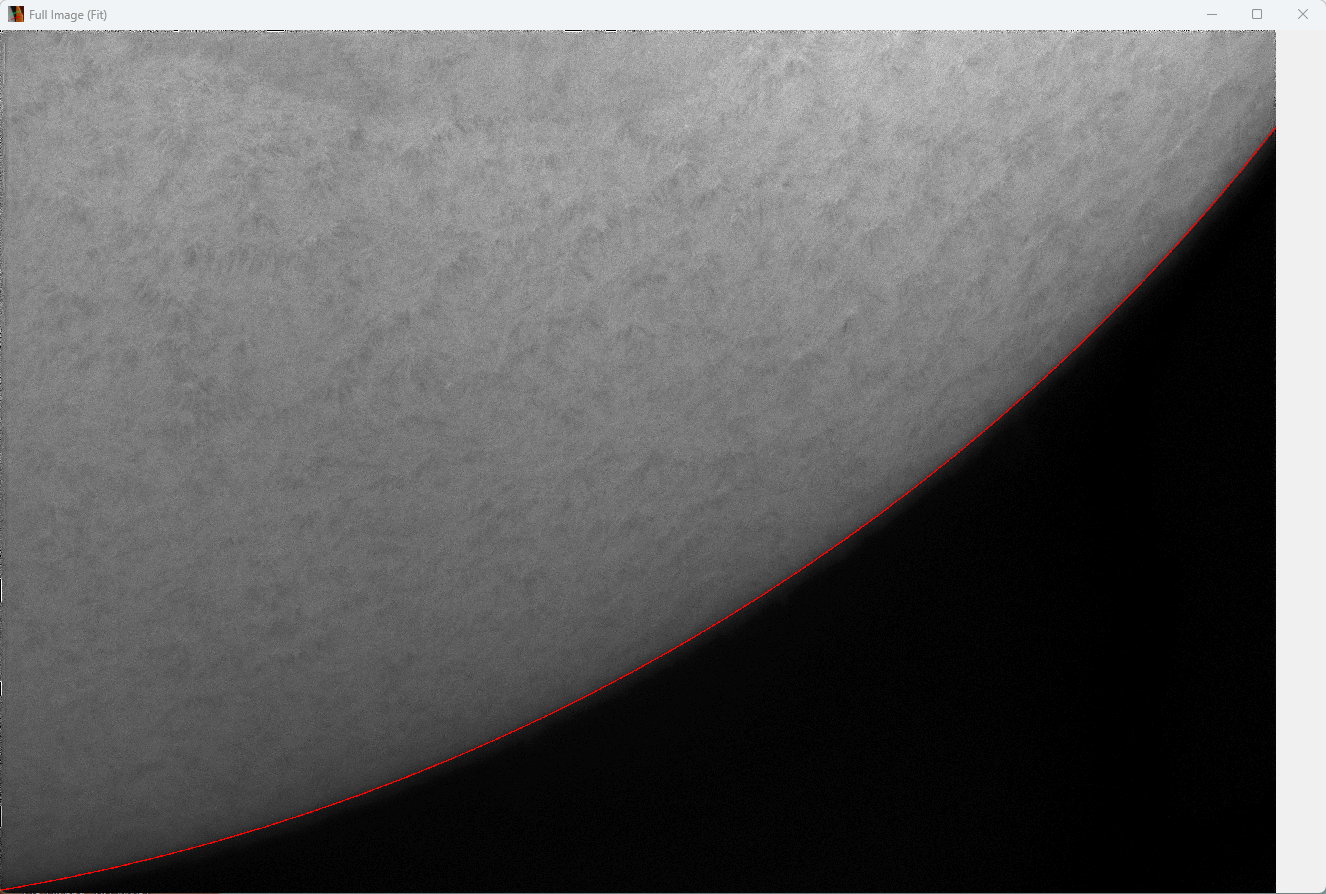
| If you click on FIT a new window opens and will show the full Right image (Fit to window)! Much faster than viewing it outside of SunGun! You may close this popup window at any time. |
 |
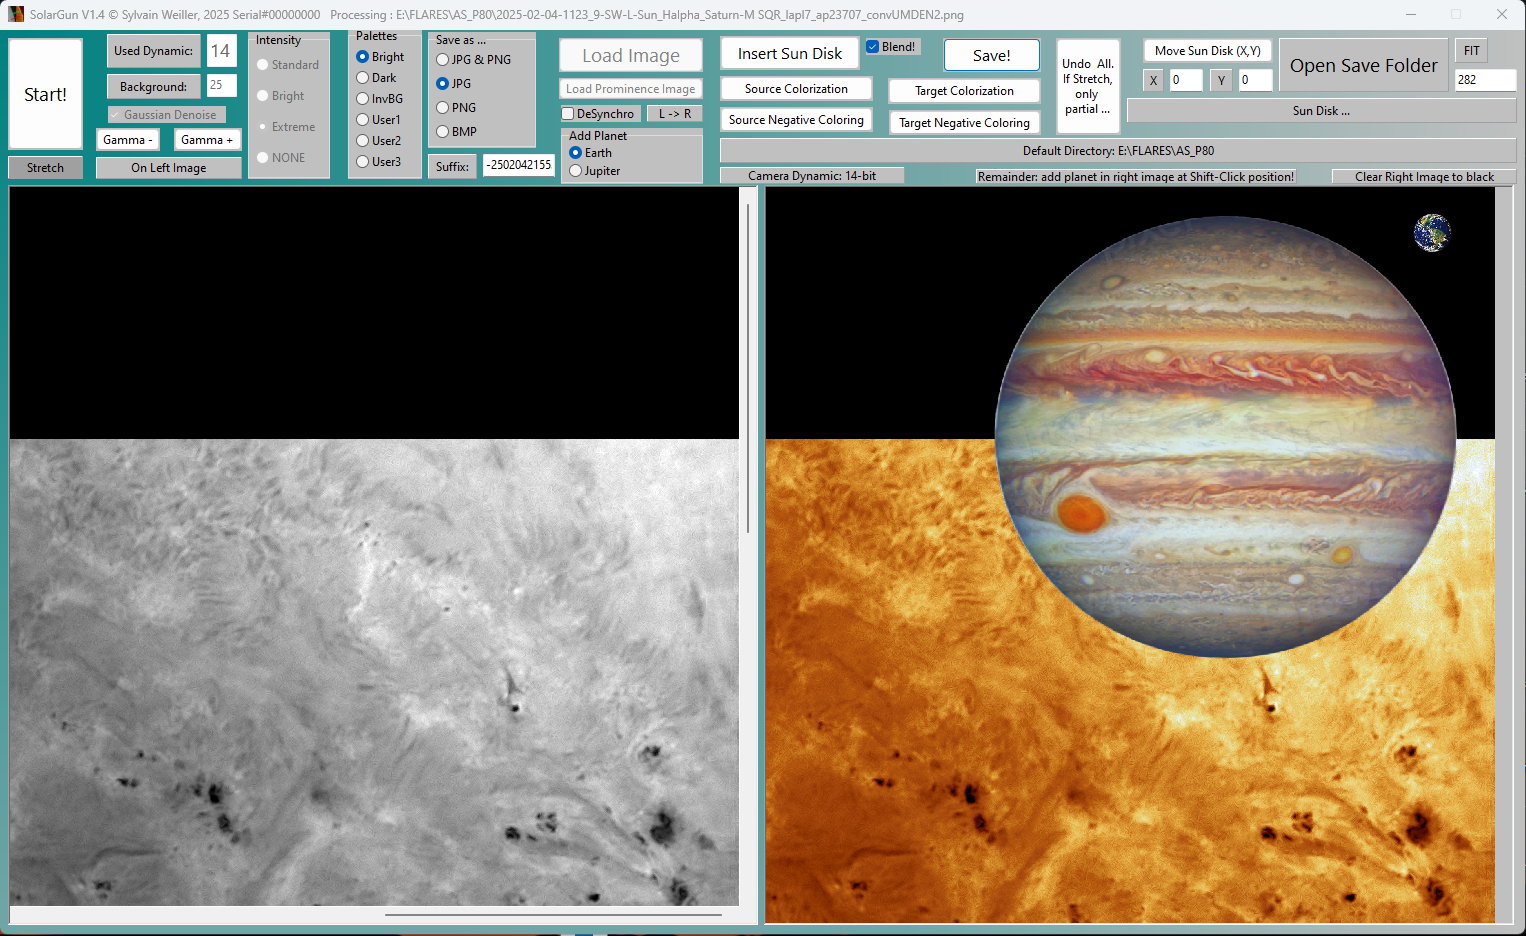
| Now load the sunspot image. See the radius of
the previous (same) Sun with limb is still there. If you scaled the
sunspot picture like I did (50%) then edit the radius accordingly.
In the 100% size limb image I found, last time, 141 then I put here
twice the value! Click 'L -> R' button. Colorise the target. Add the planet(s). Click FIT to see the result. Undo if not satisfied and re-do. |
 |
Note:
|
| Many new functions in V1.3! - Automatic suffix (-yymmddhhmm) when image are saved - Open Save Folder with Explorer - Km per pixel in the SUN image - Adding planets at scale with a simple Shift-Click (choice of Earth, Jupiter or both). The planet image is centered where you click. - Gamma - [0.9 per click], Gamma + [1.1 per click] on left or right images - Persistent Stretch function if original image is dark so you can place points easily. - Real camera dynamic shown - A few bugs corrected (when using the interface). |
| The last version of the interface is shown (only) in the picture below (later it is also V1.3 but bit before) |
 |
 |
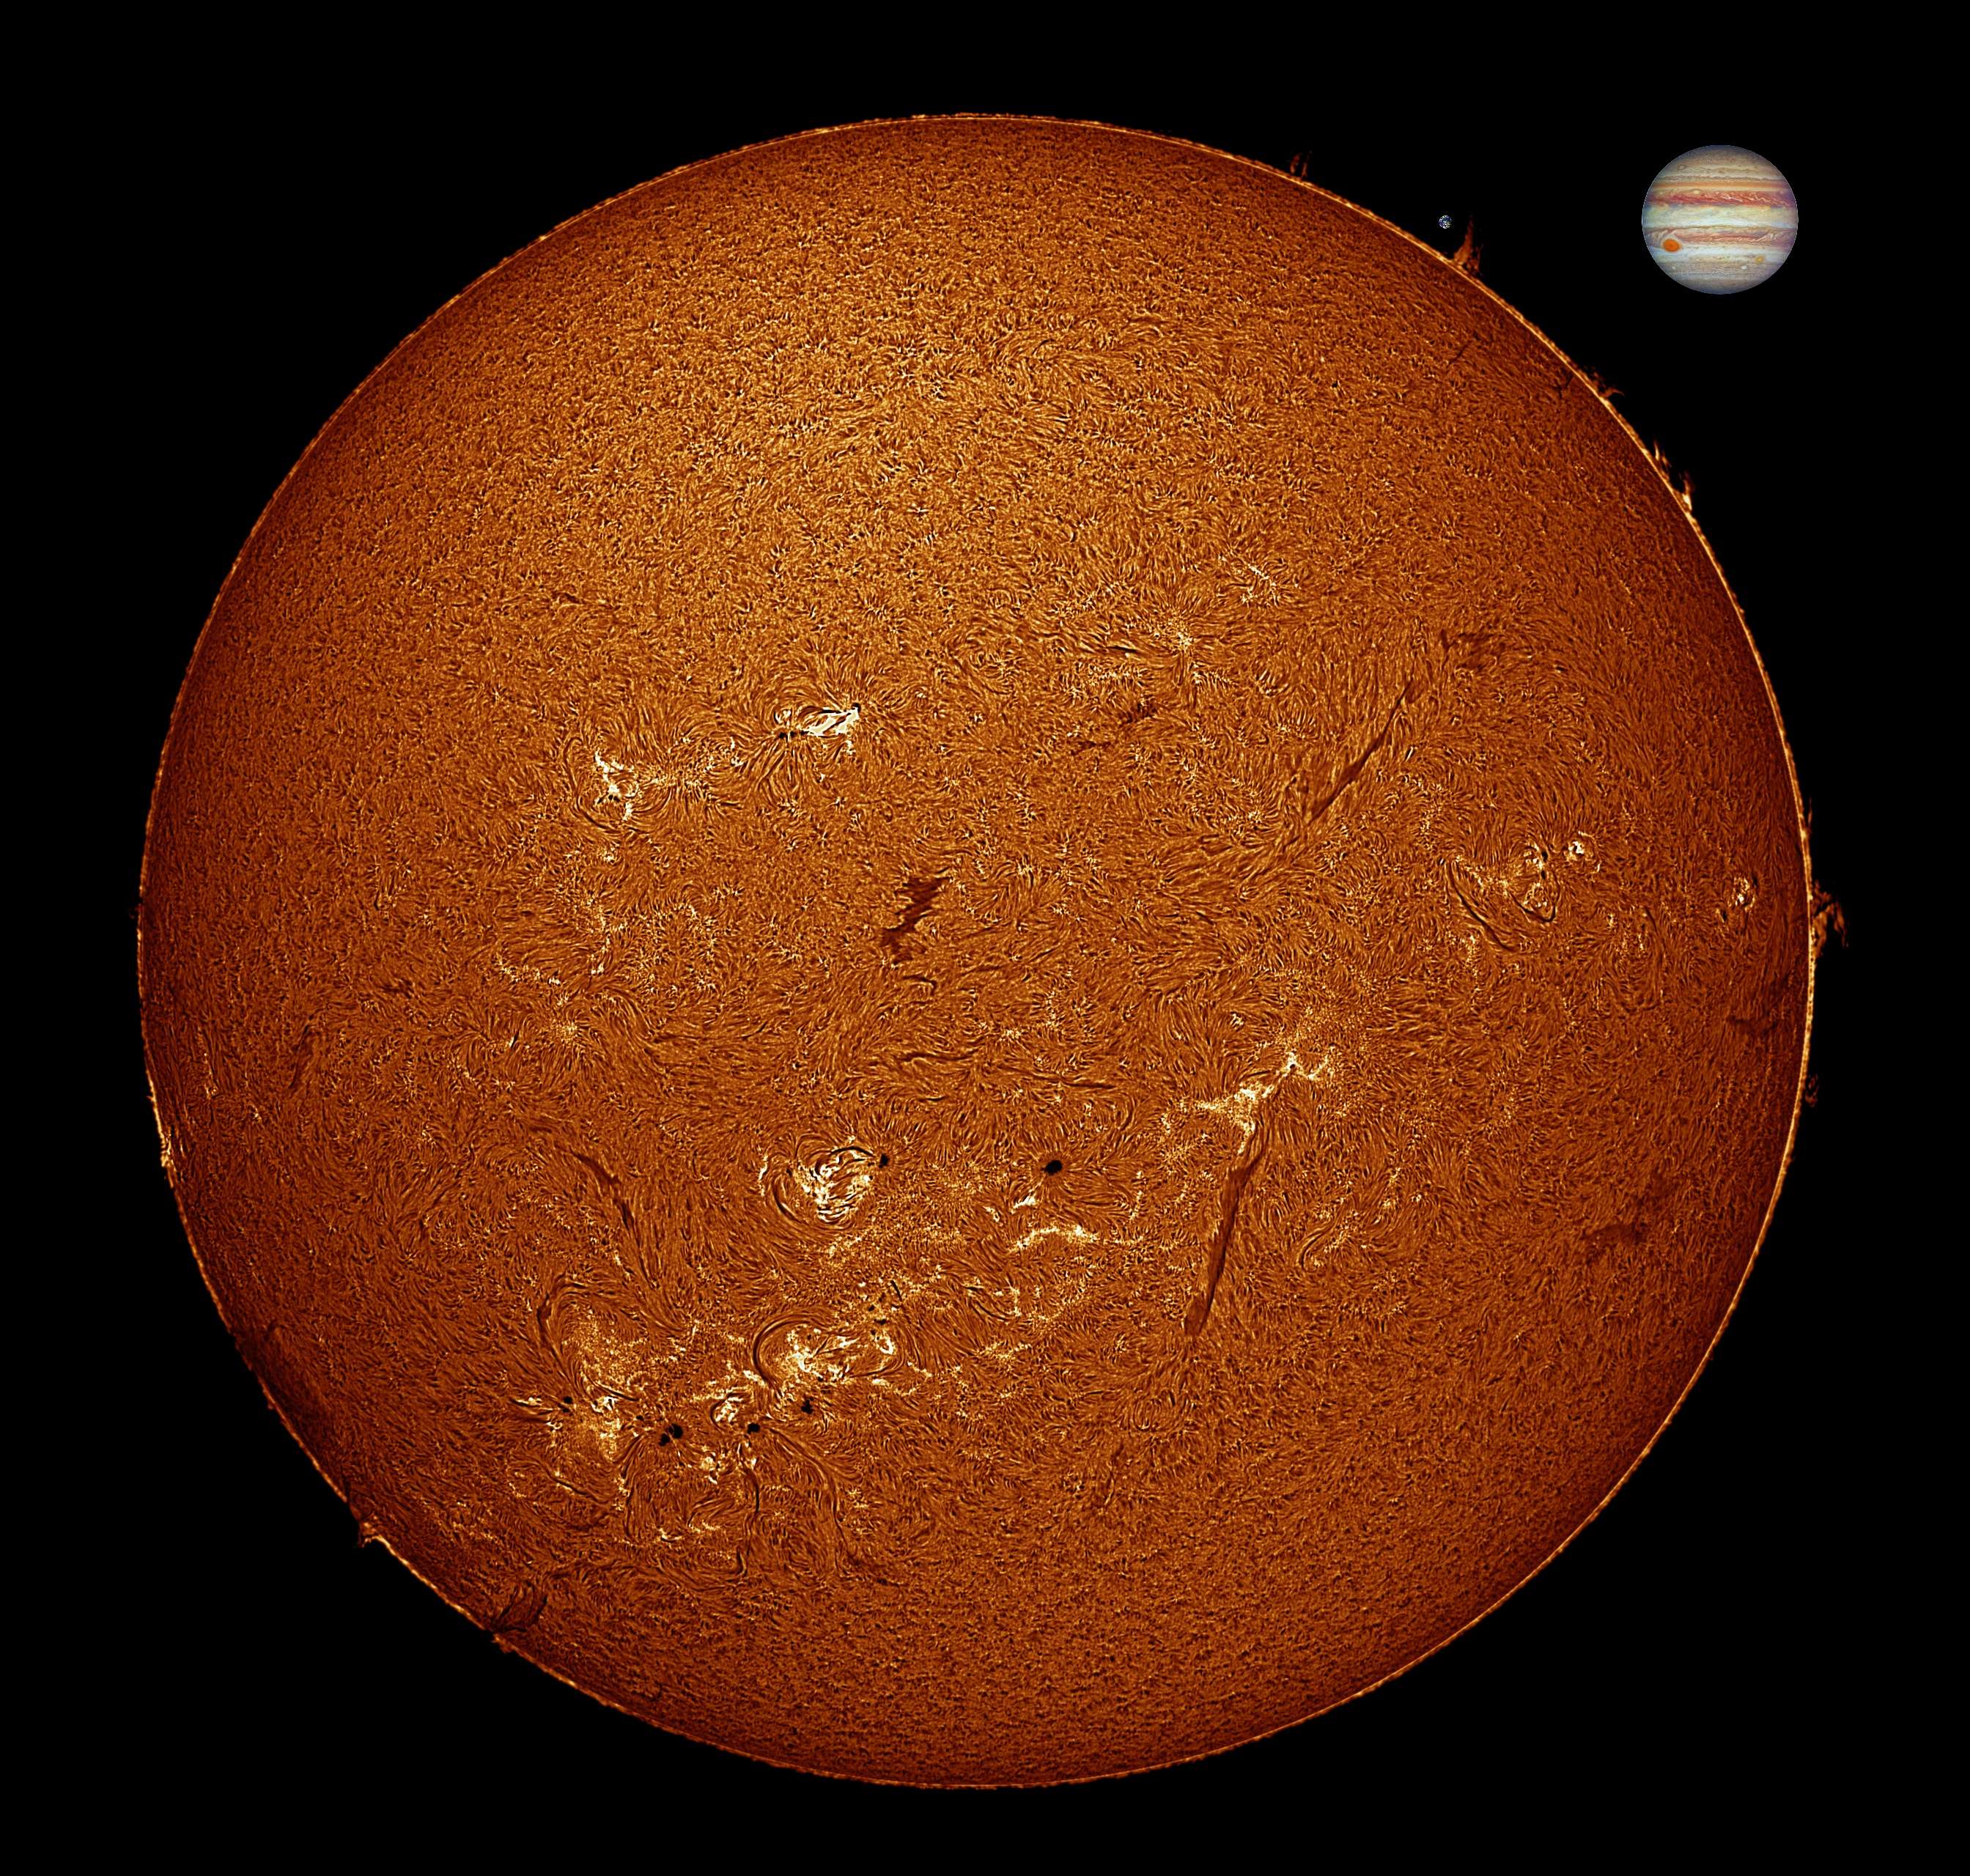
| You can also put Earth and / or Jupiter at scale where you want ... (BTW see the huge difference in size, the Earth being about the size of the GRS and almost unnoticeable in this picture! Find it left of Jupiter near a prominence) |
 |
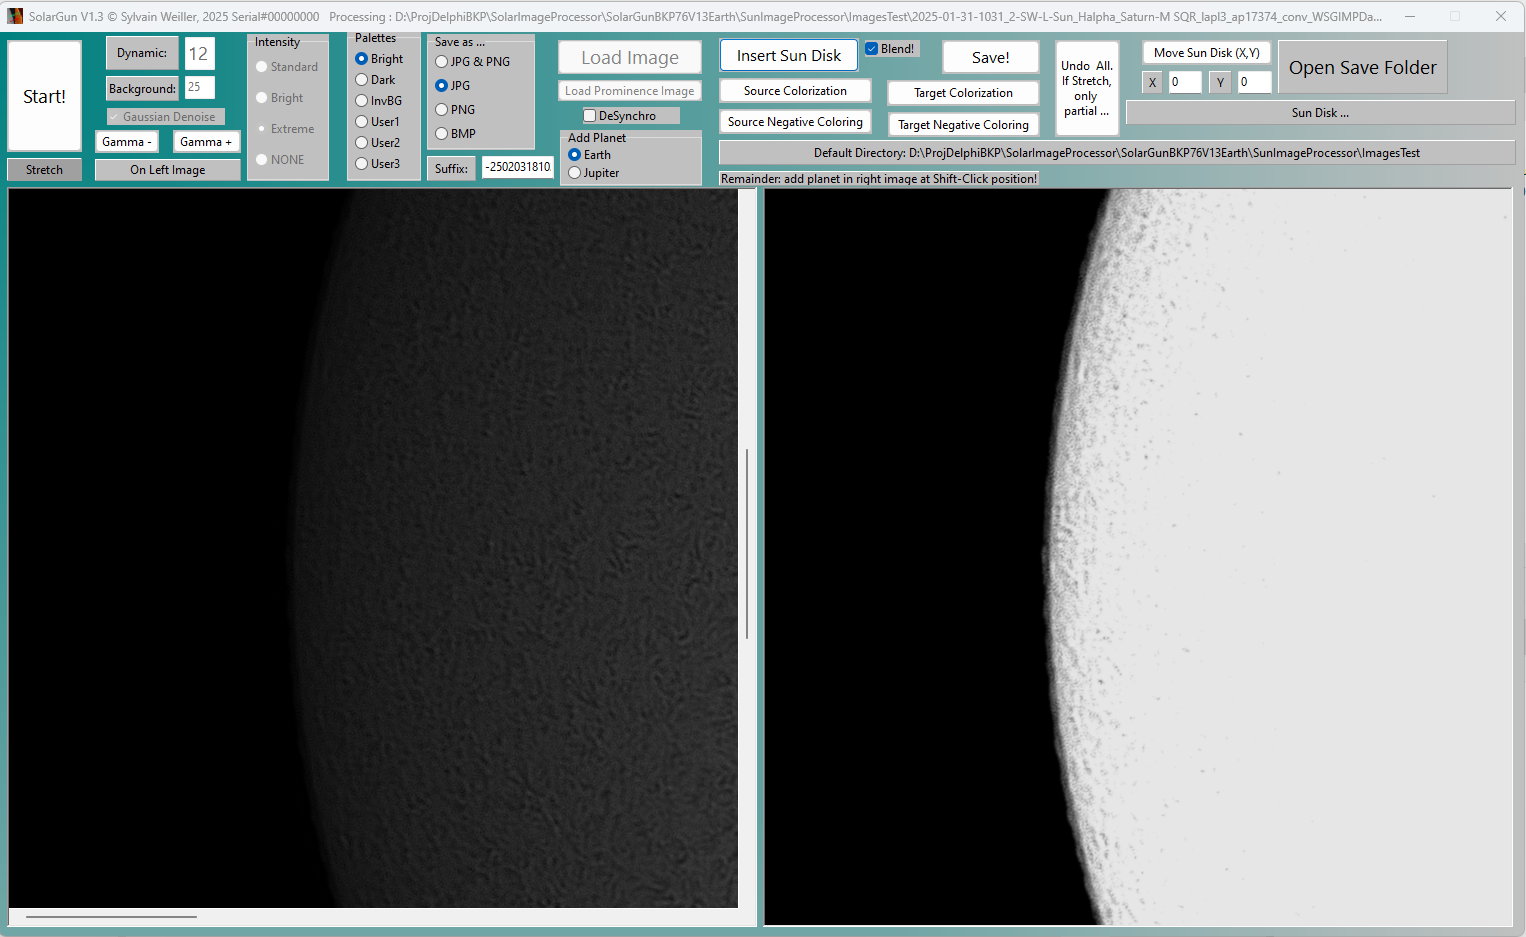
| If your original image is rather dark, see the effect of Stretch ... Much easier to place the 3 points and nicer to insert into the prominences image! |
  |
| V1.2 introduces Batch Colorization ! Super easy and fast ! Prepare a directory with all the gray tone images to colorize ... Choose your favorite Palette then click 'Batch Colorize'and select the directory. The counter at right will show the work in progress. Colorized images will be save in the same place, with the suffix: -Clr. |
 |
Processing, in pictures, from 2 original Sun images which can be downloaded right in this page in a separate zip file, TestImages.zip ... |
SolarGun is so simple to use that only a
few words are necessary ... 'Dynamic' is from the Camera
specs (16, 14, 12, 10, 8) but you may experiment with other values
/ Background,
Gaussian
Denoise,
Gamma concern
the prominence right image only; hit Gamma many times if wanted /
Intensity is the prominences amplification at loading time / Desynchro
is when in dynamic 8
two
distinct
images
are loaded to
move them independently / Blend concerns the disk - prominences limit
/ Suffix is mainly to avoid smashing previous images saved in subfolder
'Processed' / X and Y permit to move the disk if images are different.
/ Each download has a distinct Serial number. |
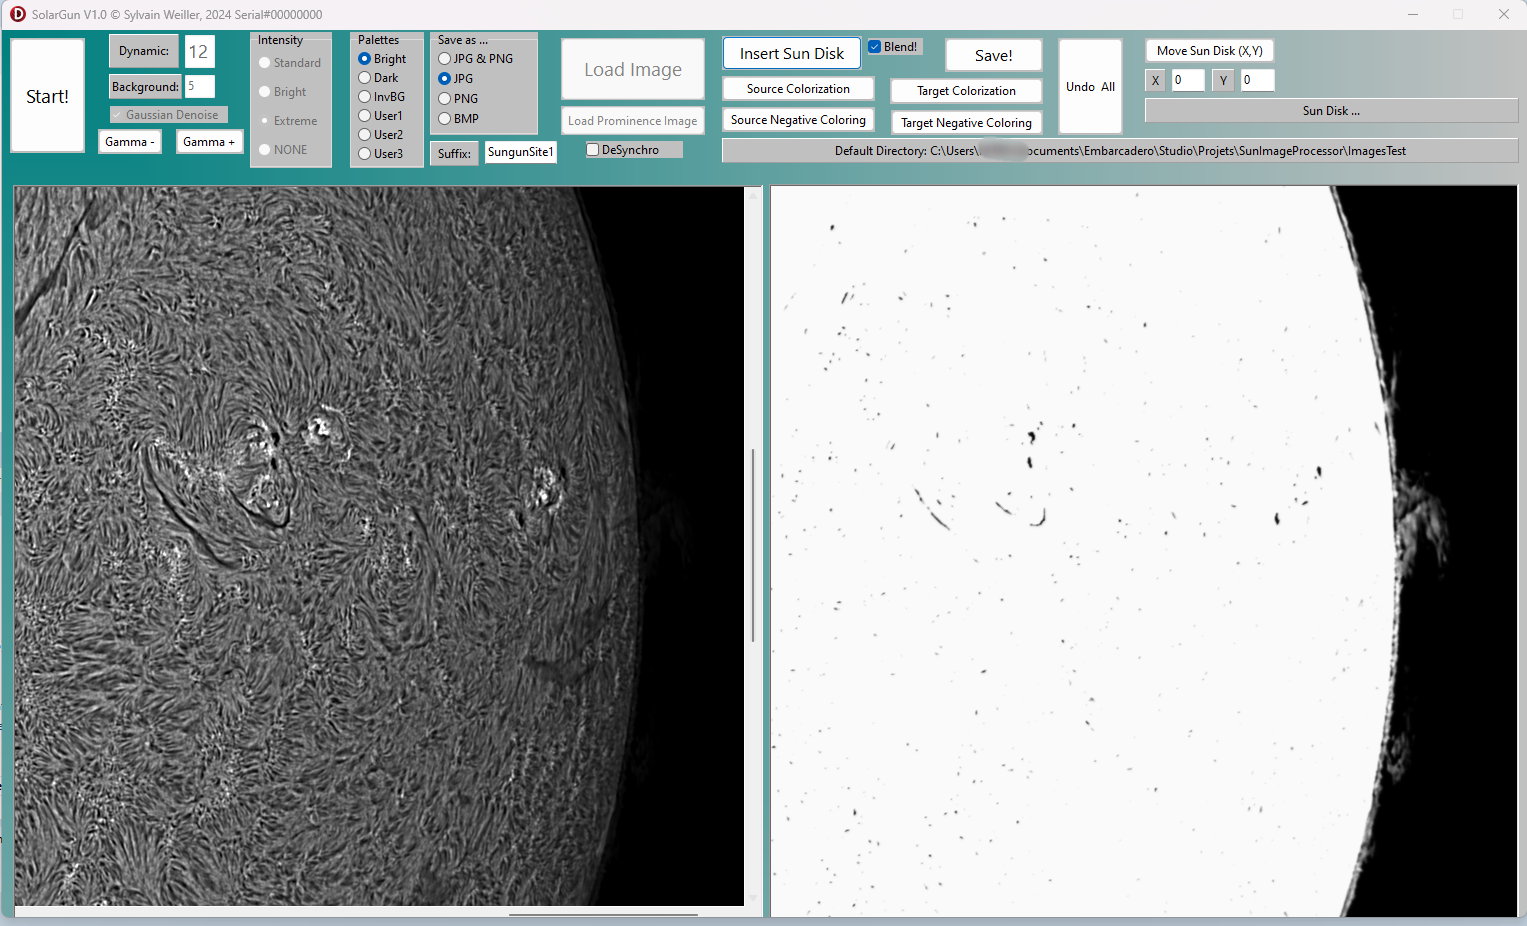
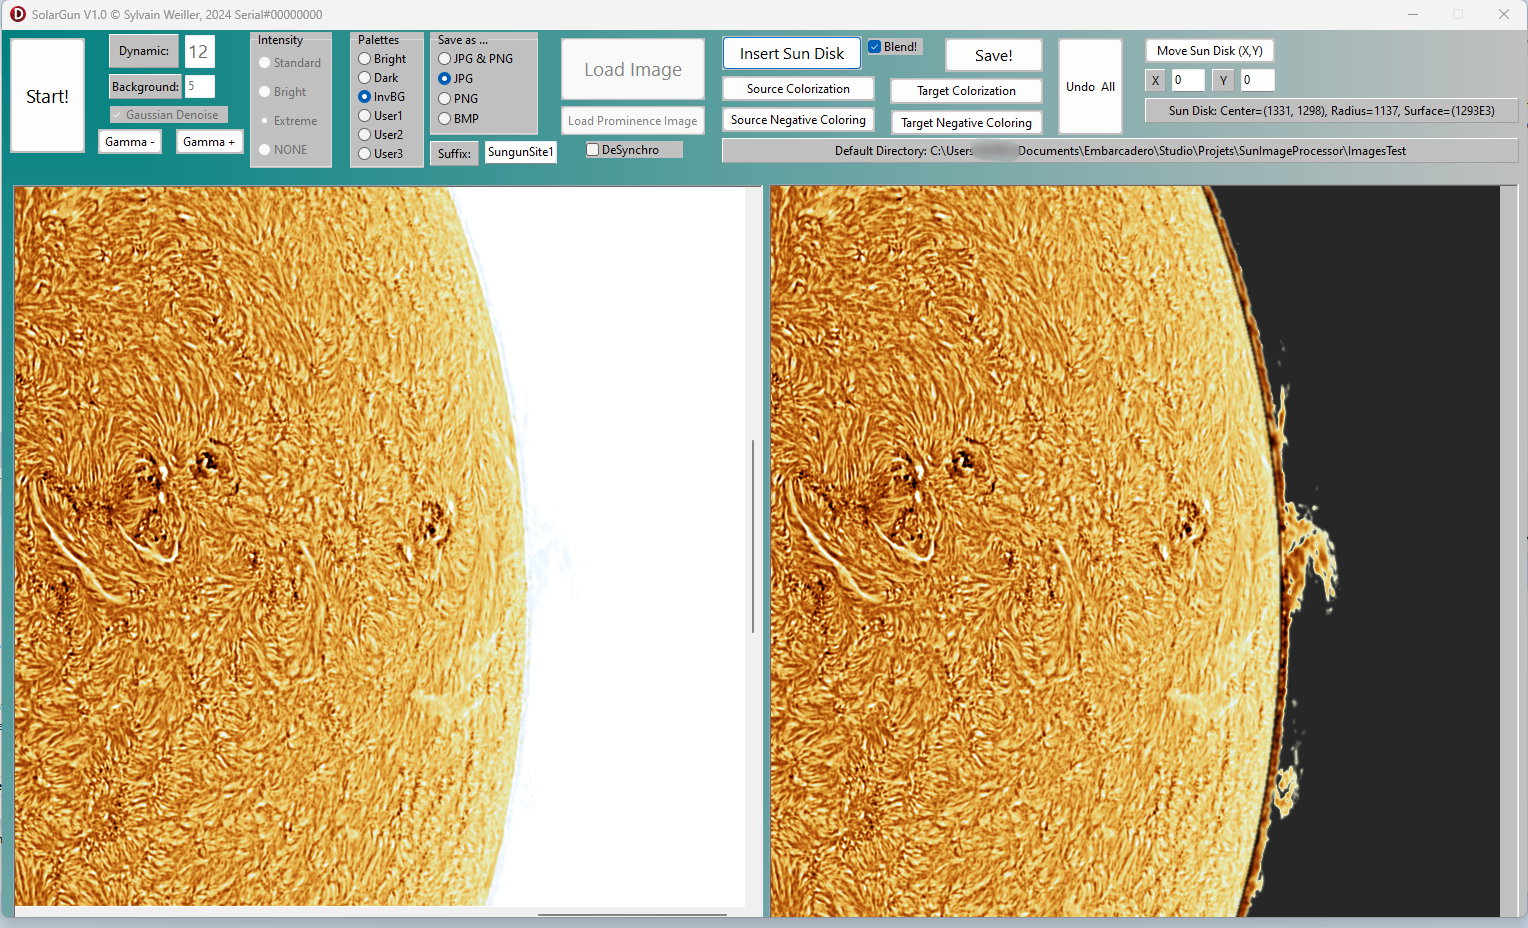
| Screen Captures from V1.0 ... LOADING original image (at left), image at right is instantly calculated from set options (Dynamic from camera, here called 12 (means RGB 3*12 = 36 bit total), Background and Intensity) ... |
 |
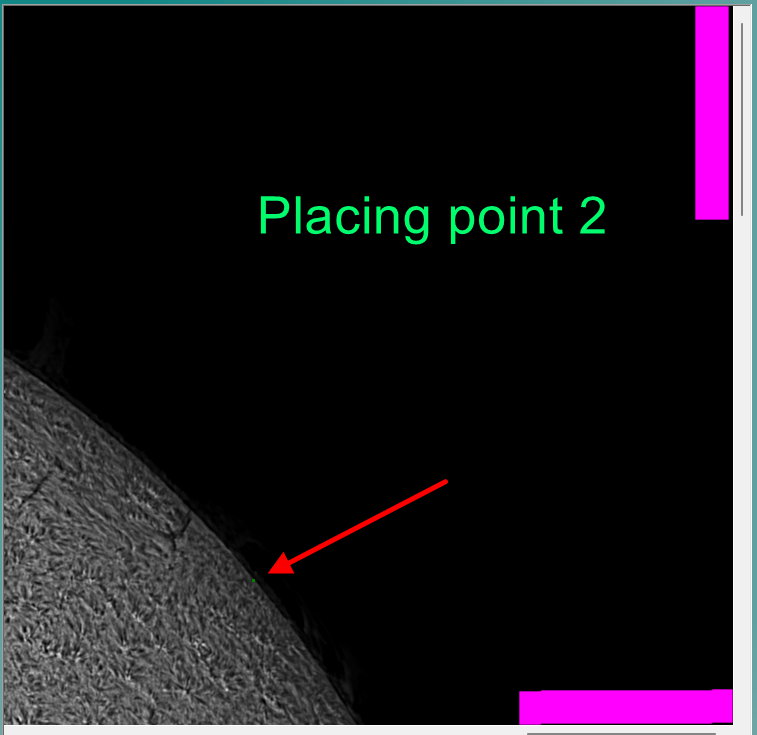
| VERY IMPORTANT : PLACING the 3 points with high precision ! Try something like this with points at ~ 120° from each other ! I show you the scroll positions in pink ! |
 |
 |
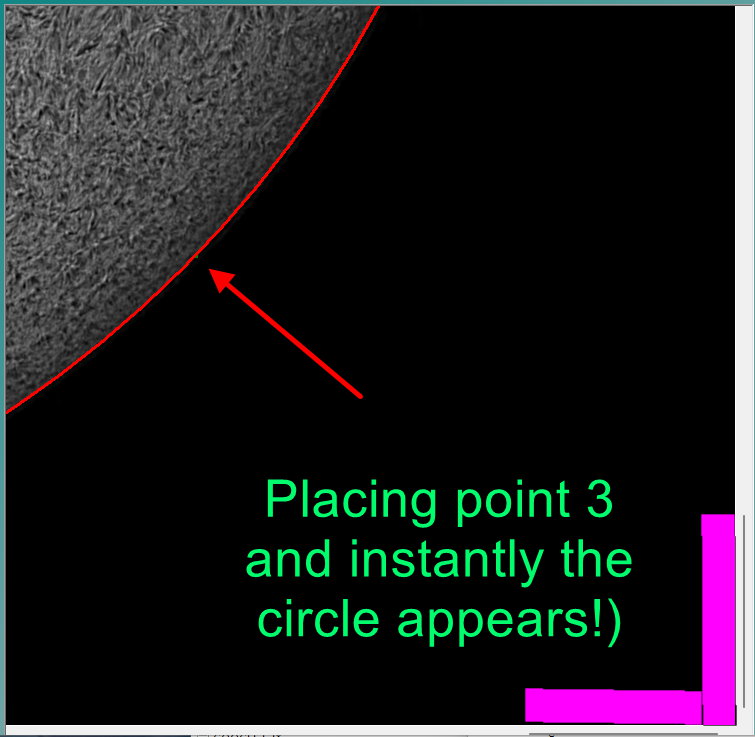 |
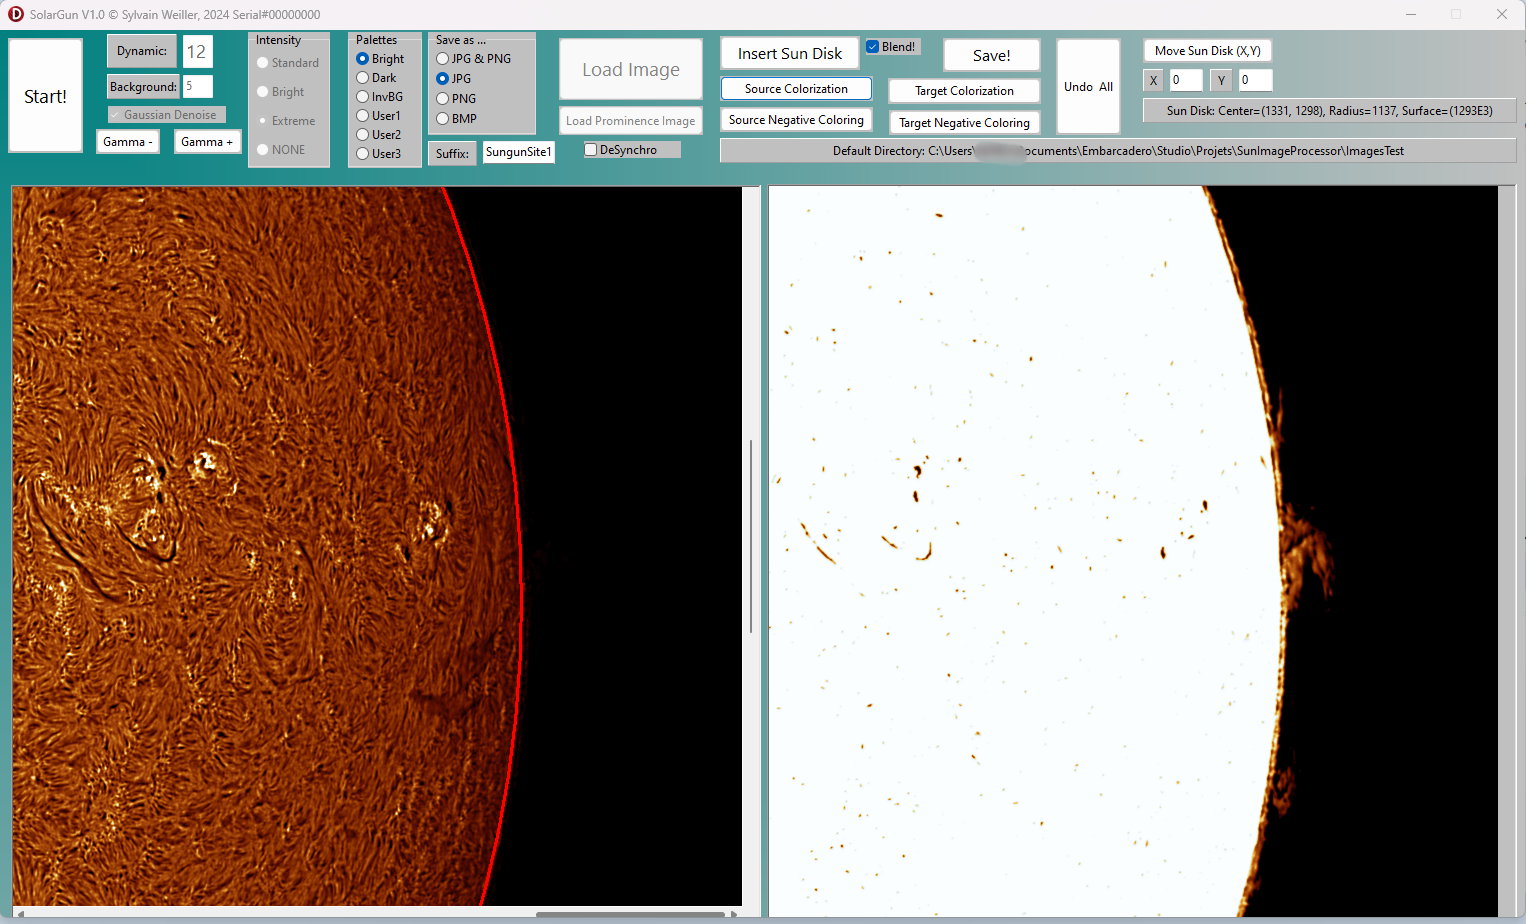
| COLORIZING left and right separately (many choices) and after placing precisely the 3 green dots to calculate the selection circle |
 |
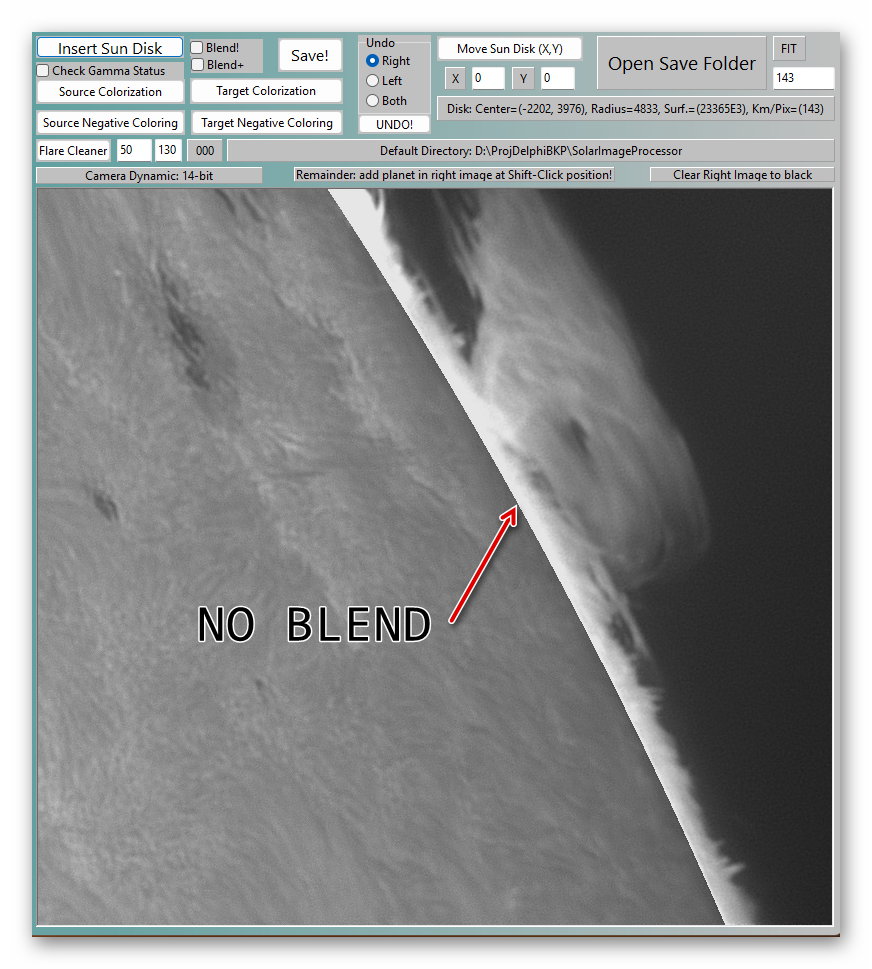
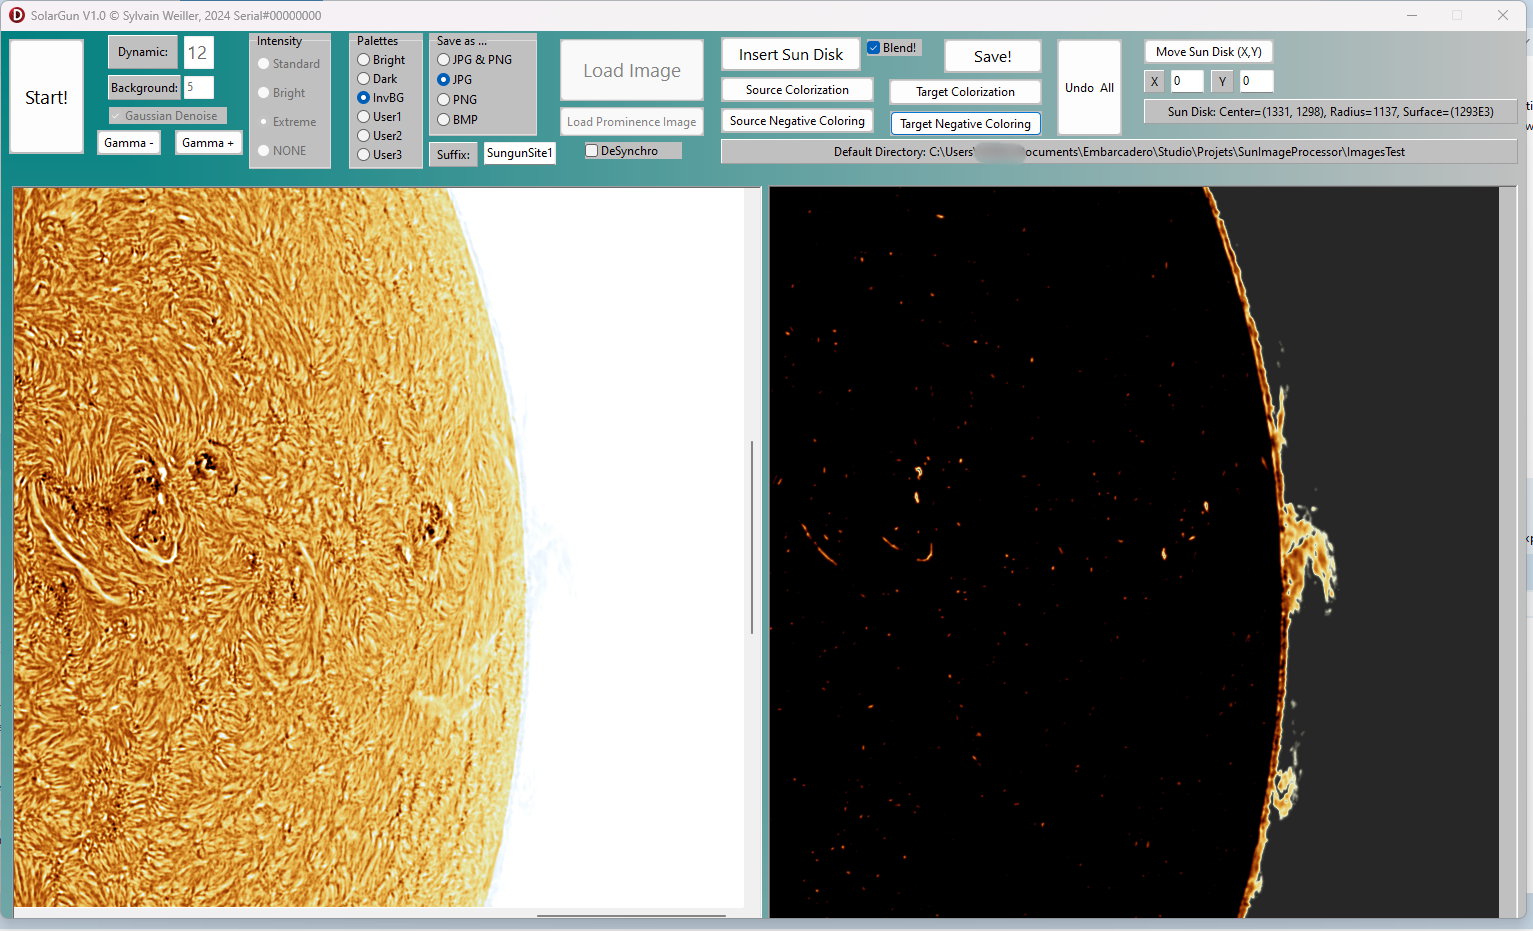
| INSERTING the Sun disk into prominences via 'Insert Sun Disk' with optional Blend ... |
 |
| RESULT, automatically saved at once in 'Processed' subfolder with other accessory images ... |
 |
| AFTER 'Undo all' we can explore more possibilities ... The disk circle, albeit not visible, is still there ! You don't have to re select dots ! [If you want to redo the circle, first right clic on source to allow placing new dots] |
 |
| INSERTING disk directly after negative coloring ... |
 |
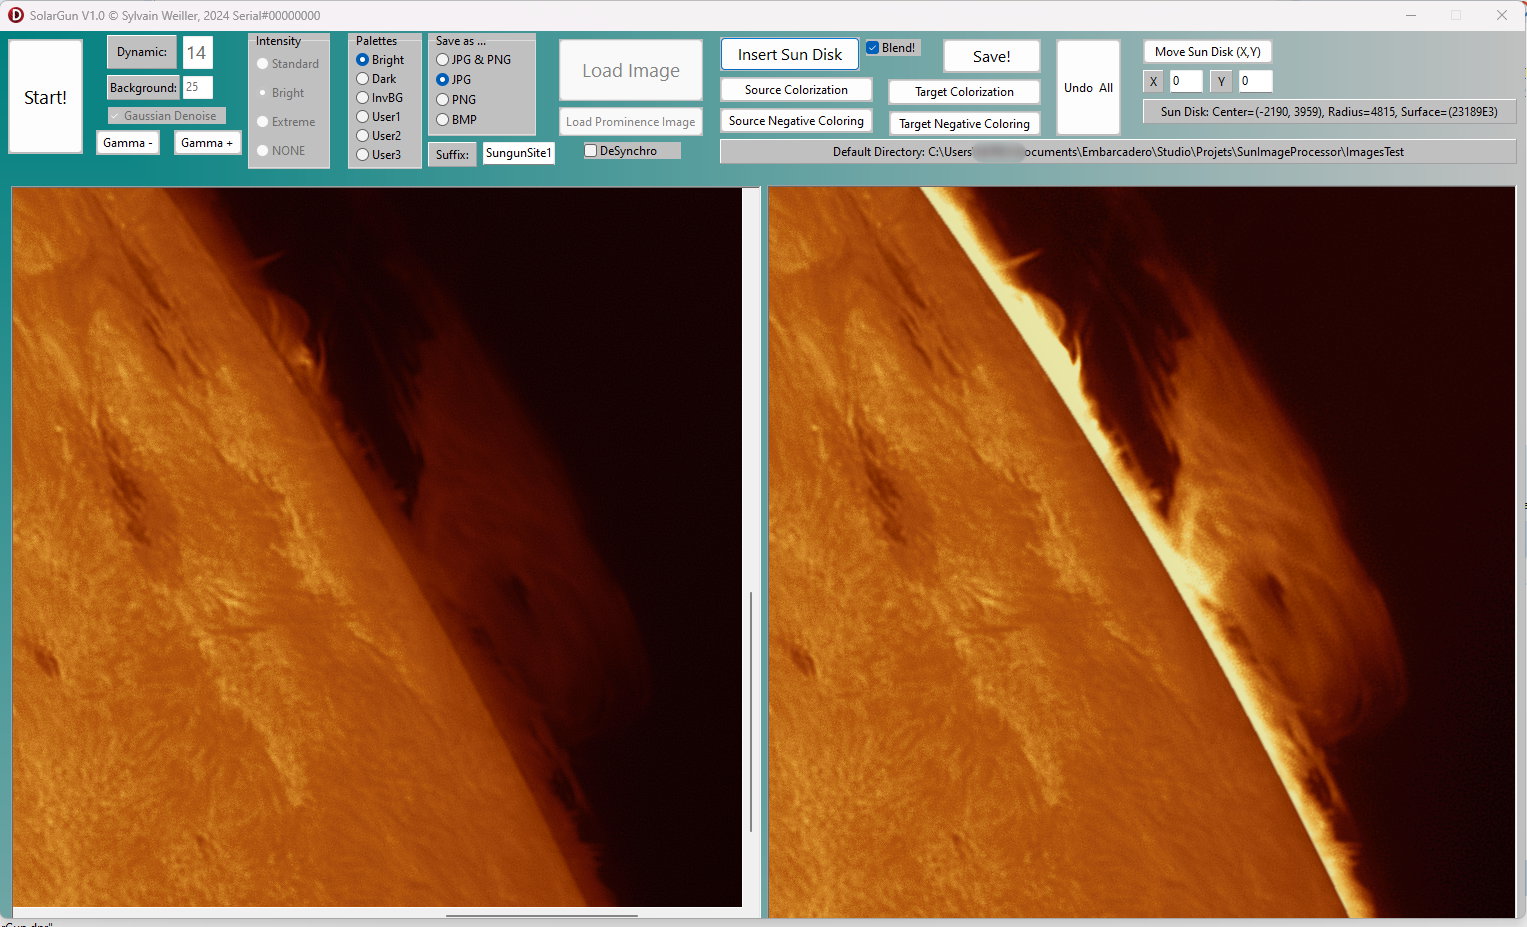
| NOW the second image (Dynamic of this image is 14 - 42 bit), let's enhance the prominences and colorize ... |
 |
| Just showing the end of the process (similar to above) ... Dynamic is now on 14, background at 25 and prominence's intensity reduced to 'Bright'. |
 |
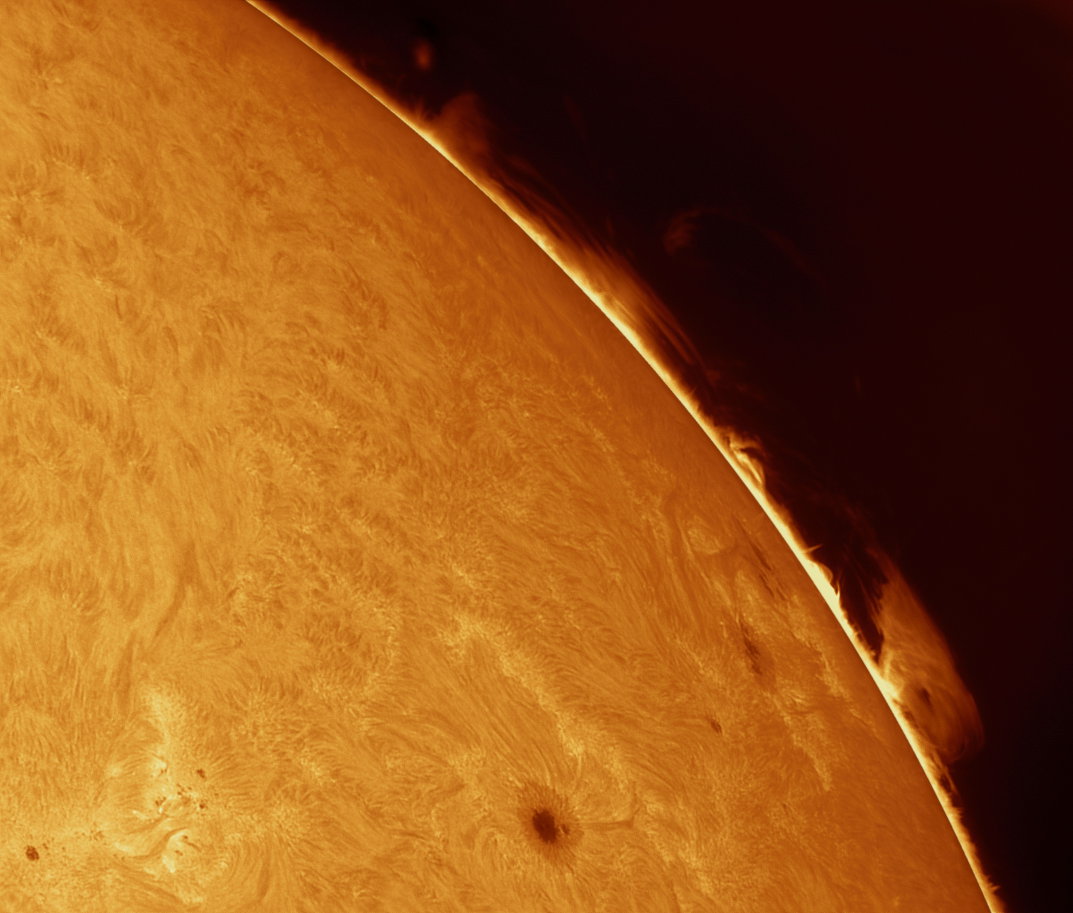
| RESULT image ... |
 |
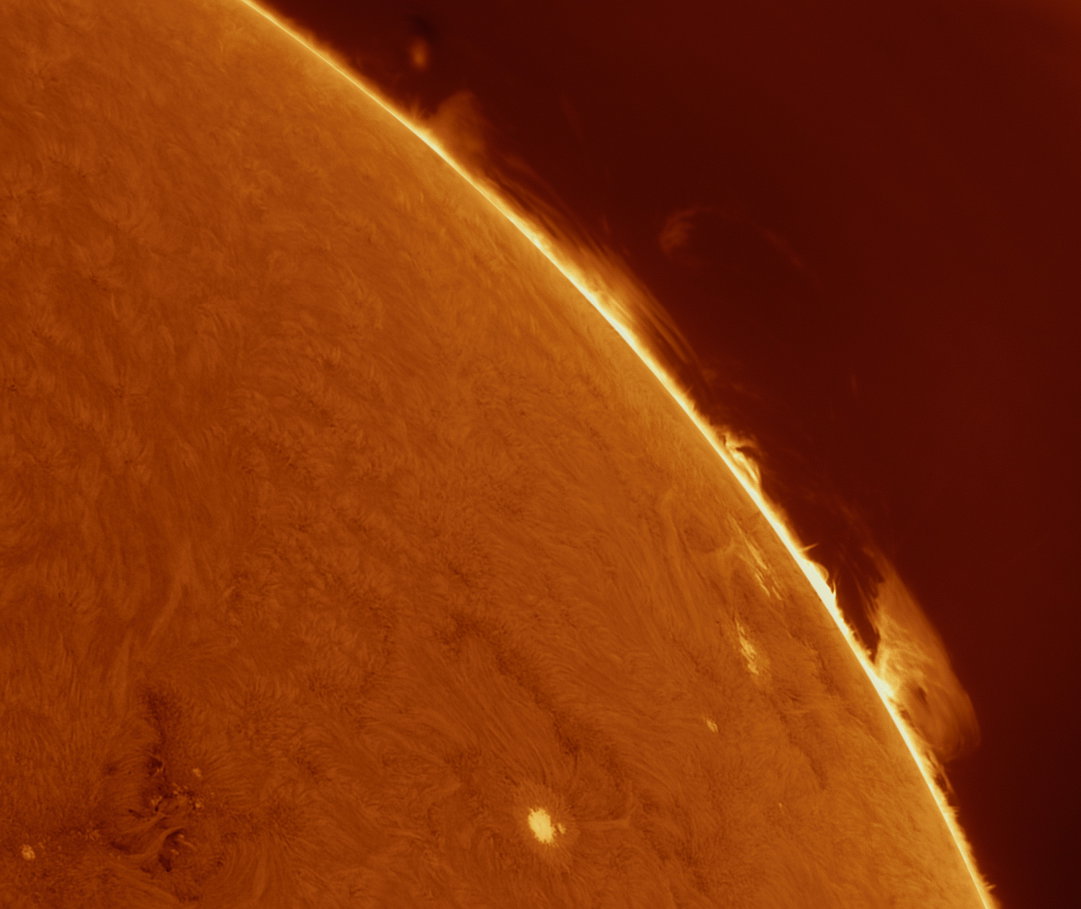
| ANOTHER COLORIZATION TRIAL with InvertedBackground palette and negative disk coloring ... |
 |
| RESULT is already there :) |
 |
** DOWNLOADING ** |
FREE for personal use only. If you agree to above
conditions, click DOWNLOAD Of course, I would appreciate if SolarGun is mentionned in your publications! |
Application gratuite pour une utilisation
personnelle. |
| Suggestions received: |
| *** Reported bugs in v1.7: None *** If you serial number is <= 386, please update ! |


