Oct. 2014 : A new optimized
process for the upload/broadcast on the Internet of quasi live (updated
every ~30s)
better resolution images of the solar
system
(example
: planets or Sun H-alpha monitoring) using mostly free softwares .
Step by step tutorial ...
1 - Preparation of files, folders and settings
in softwares necessary for a broadcast
(This is a test broadcast, later you can change folder/names
parameters to suit your wills) ...
generally done once !
a) Download and install the following softwares
: FireCapture V2.4.06*,
Autostakkert!2 V 2.3.0.21*, Watch
4 Folder 2.5*, Irfanview 4.38* and shareware Fling
File Transfer Plus V2.35 (NCH Software) *
(* or
later versions).
If not present create shortcuts of those softwares on the Desktop.
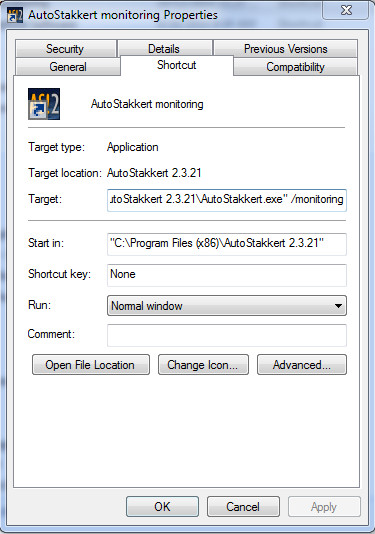
b) Duplicate AS!2 shortcut and call it "AutoStakkert monitoring". Right click on it and modify as below the Target text line so it will be opening AS!2 in command line /monitoring mode :
c) Create a new folder on the Desktop called
"2AS2Broadcast" and inside a subfolder called
"AS_p50" where the registered AS!2 files
will be saved in.
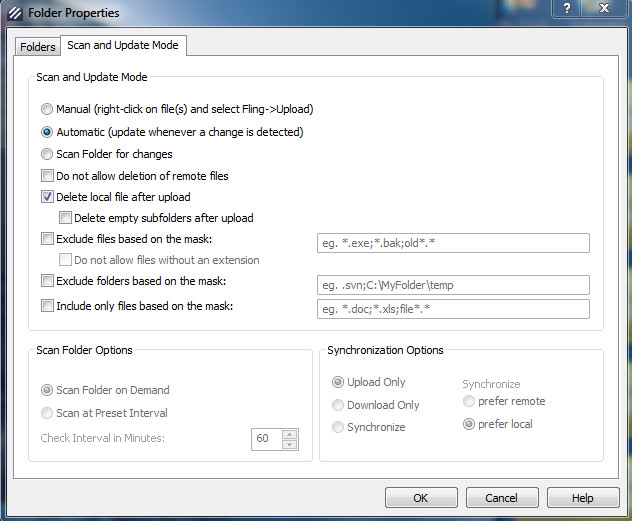
Note : the reason is that in this test run, we will use '50' as "Frame Percentage
To
Stack"
in
AS!2 (see picture below).
Create also there a folder "AS_p50_BKP".
d) Create a new folder on the Desktop called "Broadcast" which will contain only the always-same-name "cam_1.jpg" image to be broadcasted.
e) Copy all of the following commands (in green + orange / see also 'Line 4 & 5' below) :
"C:\Program Files (x86)\IrfanView\i_view32.exe" C:\Users\sweiller\Desktop\2AS2Broadcast\AS_p50\*.tif
/contrast=30 /sharpen=30 /convert=C:\Users\sweiller\Desktop\Broadcast\cam_1.jpg"
xcopy /v /y C:\Users\sweiller\Desktop\2AS2Broadcast\AS_p50\*.tif C:\Users\sweiller\Desktop\2AS2Broadcast\AS_p50_BKP\*.tif
del C:\Users\sweiller\Desktop\2AS2Broadcast\AS_p50\*.* /q
del C:\Users\sweiller\Desktop\2AS2Broadcast\*.avi /q
del C:\Users\sweiller\Desktop\2AS2Broadcast\*.ser /q
del C:\Users\sweiller\Desktop\2AS2Broadcast\*.jpg /q
del C:\Users\sweiller\Desktop\2AS2Broadcast\*.txt /q
f) Create on the Desktop a new text file called "Convert2Broadcast.txt", open it and paste. Modify now YOURNAME into your user's name ! Close/Save.
g) Click on the icon of "Convert2Broadcast.txt", hit CTRL-C, CTRL-V. Rename "Convert2Broadcast - Copy.txt" into "Convert2Broadcast.bat". Copy this batch file into the folder "2AS2Broadcast".
Note : Convert2Broadcast.bat does a lot of things :
Line 1 - conversion with Irfanview in command
line mode of the original .TIF into a lighter .JPG with a generic name of
"cam_1.jpg"
created in the broadcast folder.
Line 2 -
makes a backup of the output of AS!2 in "AS_p50_BKP" for
later use (optional).
Line 3 - deleting previous cam_1.jpg in AS_p50 (AS!2
output folder ... cleaning).
Line 4 to 7 - deleting previous Firecapture AVIs/SERs
and log files (optional, but if needed
this
saves
a lot
of disk space if captures span for hours. Delete those lines from batch file
if you want to keep your
original video acquisitions)
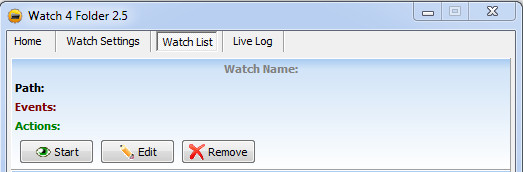
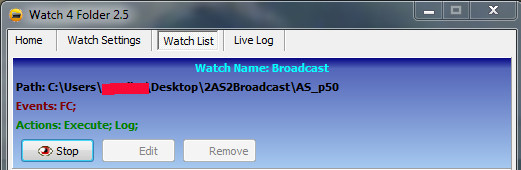
g) Parameter the automatic uploading software "Watch 4 Folder "
Create the empty file log.txt in "2AS2Broadcast" folder
In Watch 4 Folder, click on Apply and Remove "Sample" watchlist present at fist use ... you will get this :
Then enter Watch Settings and enters / load parameters as shown below
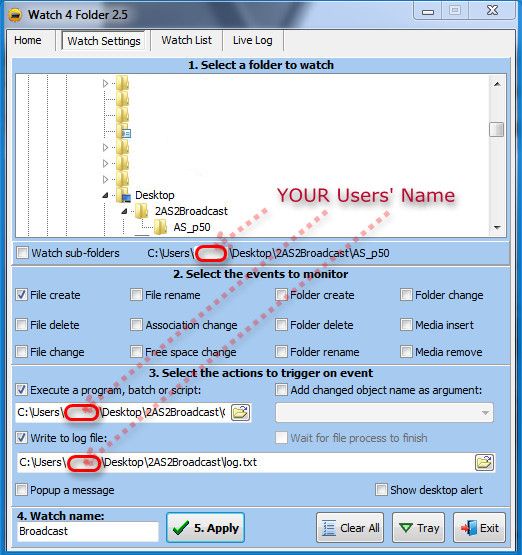
The whole content of the line "Execute a program, batch or script:" should be C:\Users\YOURNAME\Desktop\2AS2Broadcast\Convert2Broadcast.bat
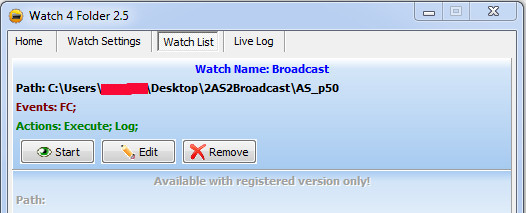
Then click apply to show Watch actions screen
In case of difficulties, your can enable popup and destop alert.
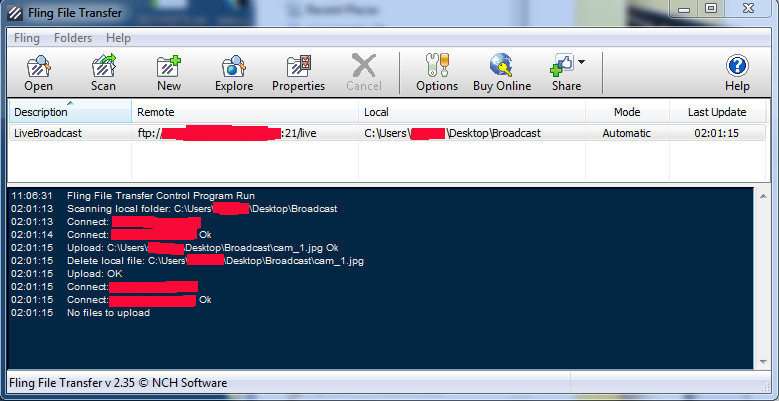
h) Parameter main page of "Fling File Transfer" with CTRL-p as shown

2 - Capturing lots of thousand or more frame AVIs (or SER) using Firecapture 2.4.06 in autorun mode !
Frame and focus at telescope level ...
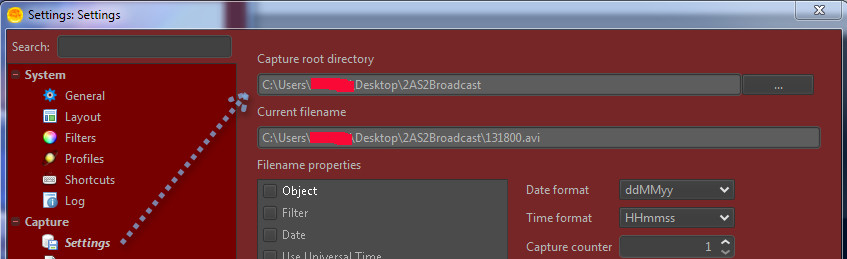
Parameter your captures in the main Firecapture window (Gain, exp, ROI, correct capture folder and filename - see below, etc.)

Autorun process ... click on this icon in top main window :

Set proper Autorun parameters :
Number of captures,
Delay in between captures,
Time or frame limit for each capture ...
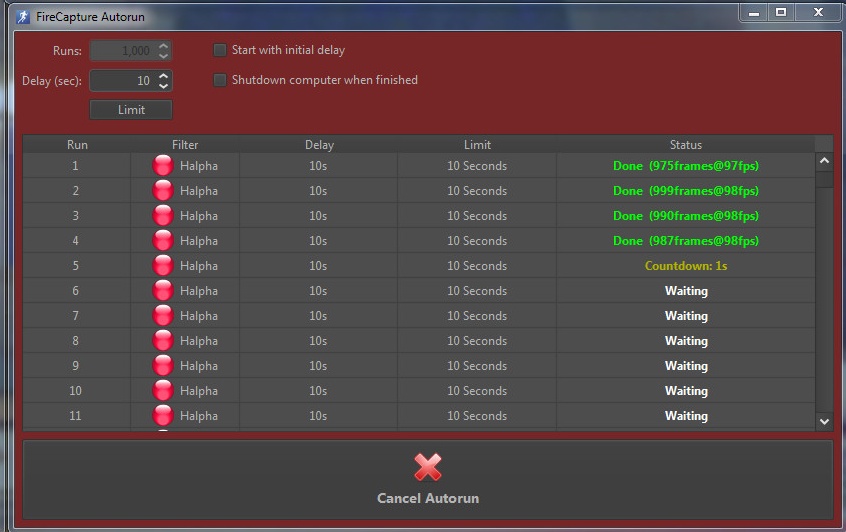
Then start Autorun ... and cancel it as
just one video has been fully done. If everything
is fine then the video should reside now in "2AS2Broadcast"
folder
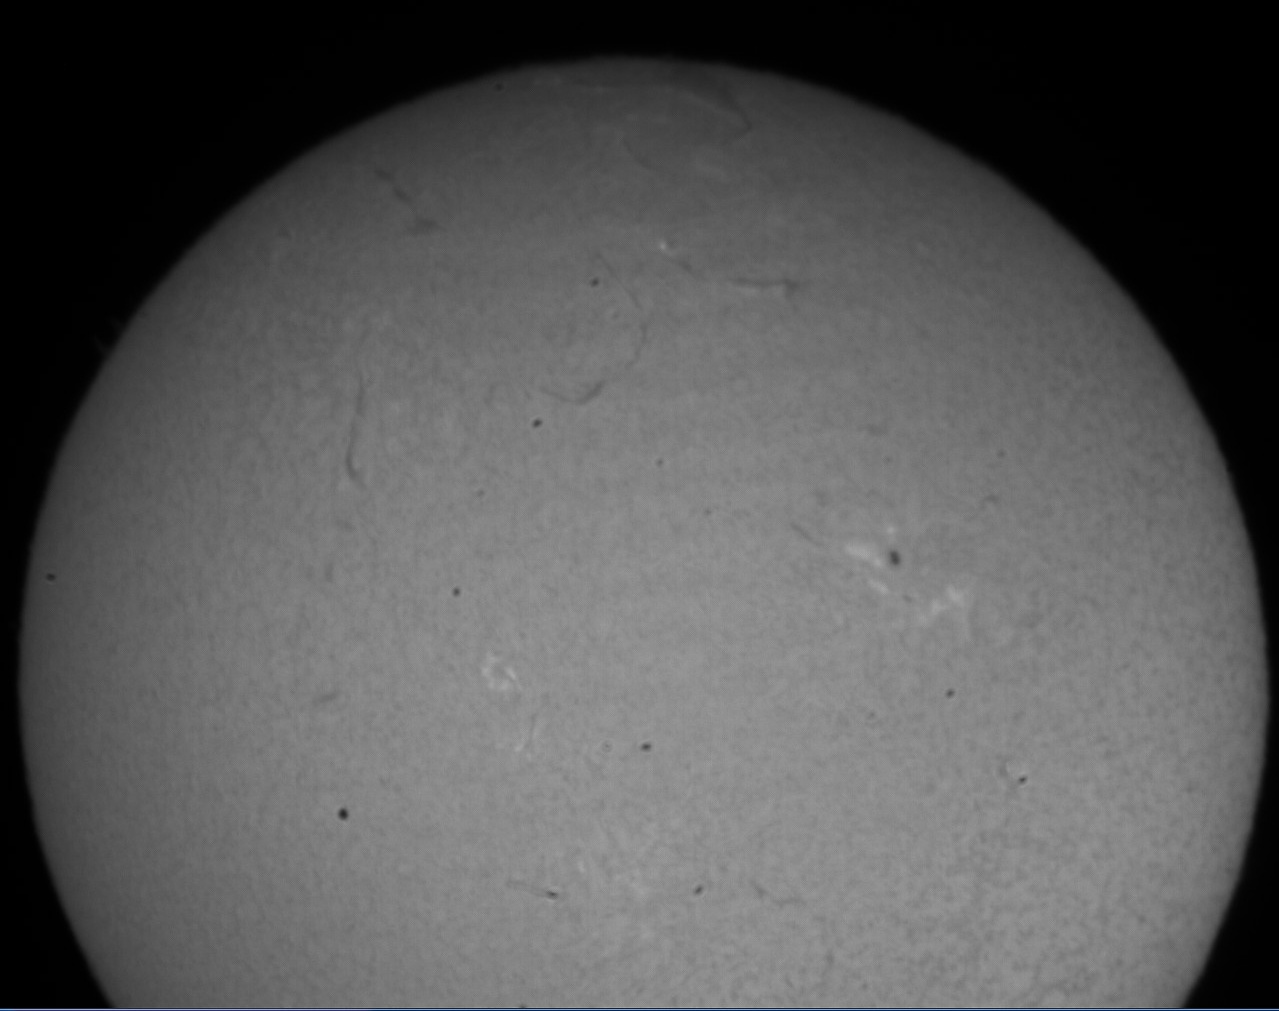
Below example of a single acquired image (PST,
HAlpha Sun, 1.6x Barlow, PL1-M camera) :
3 - Auto registering (+ optional convolution)
of the newly created AVIs or SER files
using Autostakkert! 2
in command line /monitoring mode
(planet mode only available at this time)
Start AS!2 using the special shortcut made
previously.
Be sure to set "Image Stabilization" to planet (COG), 50%
Frame to stack and TIF output.
Run AS!2 as usual (Analyse + Stack)
When run is finished, check "Monitoring" checkbox.

Verify that stacked TIF image resides
now in C:\Users\YOURNAME\Desktop\2AS2Broadcast\AS_p50\
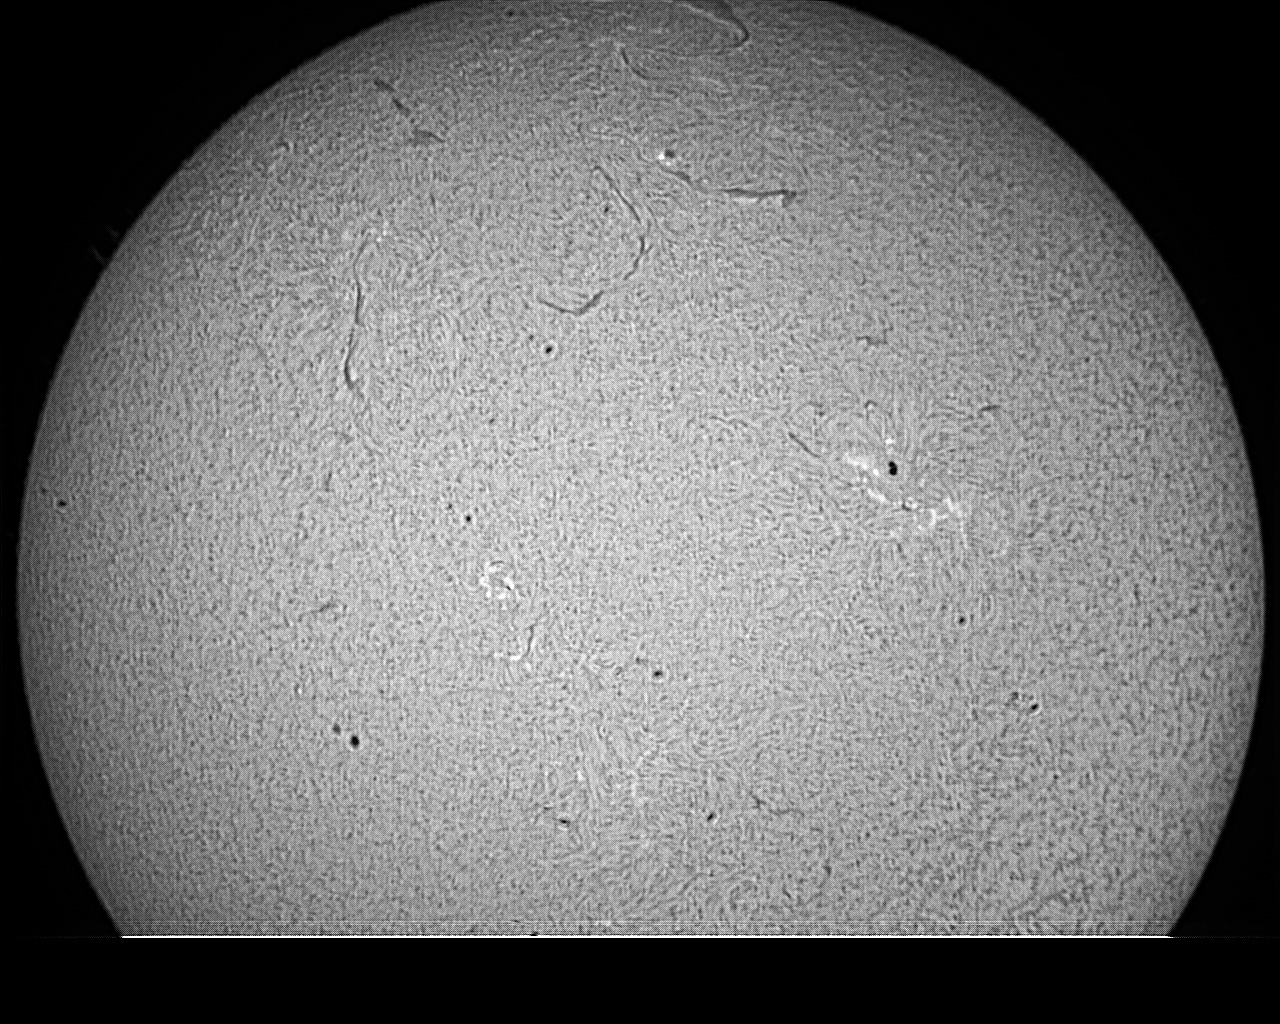
Below a test example of a registered, convoluted result (from above AVI, 10s sequence), already appreciate differences with single frames !
4 - Detecting newly created image in result Dir and running batch file ---> Watch 4 Folder
Now go back in "Watch 4 Folder" and click Start to enable newly created file detection !
Now go back in FireCapture Autorun window and start again Autorun !
Now look in the "Broadcast folder", the only file there, cam_1.jpg, should refresh continuously as soon as a new capture is processed and saved !
5 - Broadcasting ... Activating Fling !
You have now to change "Scan and upddate mode" to "Automatic then click Ok.
This screen will show the live updating of your web site page !
All texts and images of this web site strictly
Copyright
S. Weiller, 1998-2016 !
Software screen captures illustrating this article are Copyright
from their developers.