 PST
for whole disk ( and also prominences high resolution
images
PST
for whole disk ( and also prominences high resolution
imagesPST
for whole disk ( and also prominences high resolution
images
In general click for larger images ...
June 19, 2015 / PST and DMK31 Testing
DSSR scan !
A promising beta development of my drifting
technique has been implemented in DSSR.
Here is the first result in RegiStax5 (expand mode) and AstroImage 3.0 Processing (LRD 0.53'17i) :

Acquisition FOV (DMK31 @Main focus) :

Scan Parameters:
RA d sec 50
D d sec 1 (0 is not allowed)
Dd ms 100
EtG pix 50
Grouter
May 6, 2015 / PST and ASI120MM-S
... A new improvement of the drifting technique !
Reminder : original FOV with the camera :

The problem leftover with my drifting
technique was that the extreme parts of the drifting got much less frames
than
the center. The consequence was 2 noisier zones : see Mars 3 image
and look at right/left (good) then top/bottom (worse).
In earlier attemps,
when I acquired more images at these extremes before and after drifting,
I got a few annoying horizontal lines at the level of drifting
begin and end.
I tested a new solution today are the results are - despite strong winds - much encouraging ... Prominences at top and bottom are not noisy ! |
||
 |
 |
 |
AS!2 Conv sharpened
with blend 50/50 |
Astra Image LR deconvolution 0.80, 12
iter |
|
 |
 |
 |
Astra Image LR deconvolution 0.80, 12
iter + curves (slight prominence enhancement) |
Idem image 4 Map
Sample colorized in GIMP + Contrast 20 / Lum 30 |
Idem Image 5, inverted
then Hue at left for pink version |
The idea is to do some up-down movements for 20s at begining and end of the tranlation.
Best speed is 2x guiding rate. The exposure should
be short, not more than 5 ms !
See the reduced size Movie (xvid) showing the movements in real time ...
New : Apr 29, 2015 / PST and ASI120MM-S ... drifting (a few vertical back and forth)
drifting moves (very small size but real time)... will try bigger images later


Processing : Best registration with REGISTAX5 !


Apr 07, 2015 / PST and DBK21 ... Testing
the drifting technique
with random moves in all directions with the smallest
sensor available, 640x480 :)
Guiding softwares would do it better !
A point not to forget : when inverting
DEC I think something should be done to take care of the long lag time at guiding
speed
...
Accordingly this one was done at 8x speed in ~90s...
|
FireCapture v2.4 Settings |
New : Apr 07, 2015 / PST DS ASI174MM
|
FireCapture v2.4 Settings Date=070415 Mid(UT)=155702.732 Duration=60.001s LT=UT Frames captured=5474 File type=SER Bit depth=16bit Shutter=10.00ms Gain=284 USBTraffic=60 Gamma=50
(off) Limit=60 Seconds Processing Lucy Richardson deconvolution in Astra Image 3.0 : 0.5 / 18i, Gamma Curves in Wx (click for larger)
|
Mar 25, 2015 / Simple PST imaging (single
stack today)...
Just eyepiece projection (Seren 8 - 24 mm, @20 mm)
and
Canon SX230HS in P mode
(2s delay to avoid shaking)
maintained with a rubber band against the eyepiece ...
 Same
with PST-DS (double stack) should be done asap !
Same
with PST-DS (double stack) should be done asap !
| Rather dark image for disk ... | Light image for prominences ... | |
 |
 |
Model - Canon PowerShot SX230 HS Filename - IMG_1501.JPG |
| Combinaison of both pictures by superimposition in PSP | to gray scale | Final : colorization GIMP2 (Map from another previously colorized image) |
 |
|
 |
Mar 3, 2015 / Testing another drifting technique with the ASI174MM, the PST-DS and eyepiece projection (MARK III 8-24 Hyperion zoom) @ 16 mm

Technique today was to start dead center (were all the
activity sits then best resolution there) and make alternate up and down
moves to cover the full Sun for a total time of 90s.
Frames captured=2505 File type=SER Binning=no Bit depth=16bit ROI=1936x1216
FPS (avg.)=27 Shutter=10.00ms Gain=400 HighSpeed=on AutoExposure=off Gamma=50
(off) SoftwareGain=10 (off) Brightness=1 USBTraffic=60
FEB 24, 2015 15:40:33 UT / Testing the ASI174MM with the PST-DS and 16 mm eyepiece projection (MARK III 8-24 Hyperion zoom)

Poor conditions: End of afternoon low Sun (15° only), hazy, (it rained hard just before that's good !), just a single clearing, not enough time to make a nice focus adjustment and refine all parameters !
FireCapture v2.4.07 beta Settings
------------------------------------
Camera=ZWO ASI174MM
Frames captured=999
File type=SER Bit depth=8bit ROI=1936x1216 FPS (avg.)=24 Shutter=40.00ms Gain=180 USB
Traffic=60 HighSpeed=on Limit=40
Seconds Sensor temperature=29.4 °C
Standard capture (no drifting)
Processing AS!2 Color in GIMP2 North up with
Irfanview.
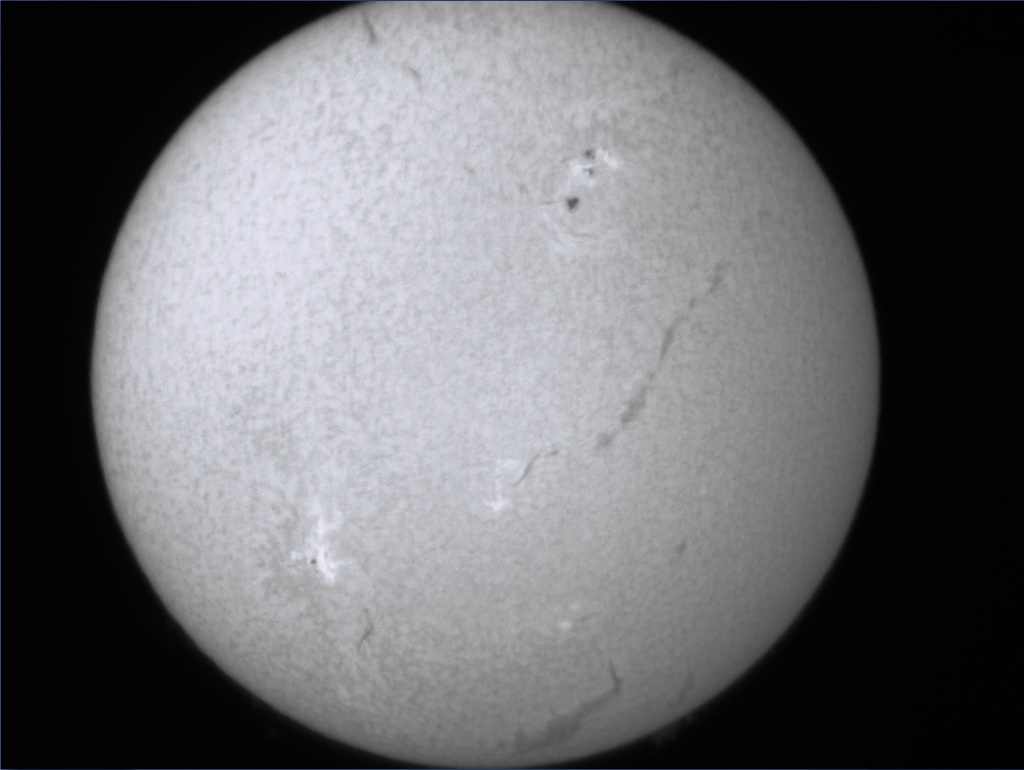
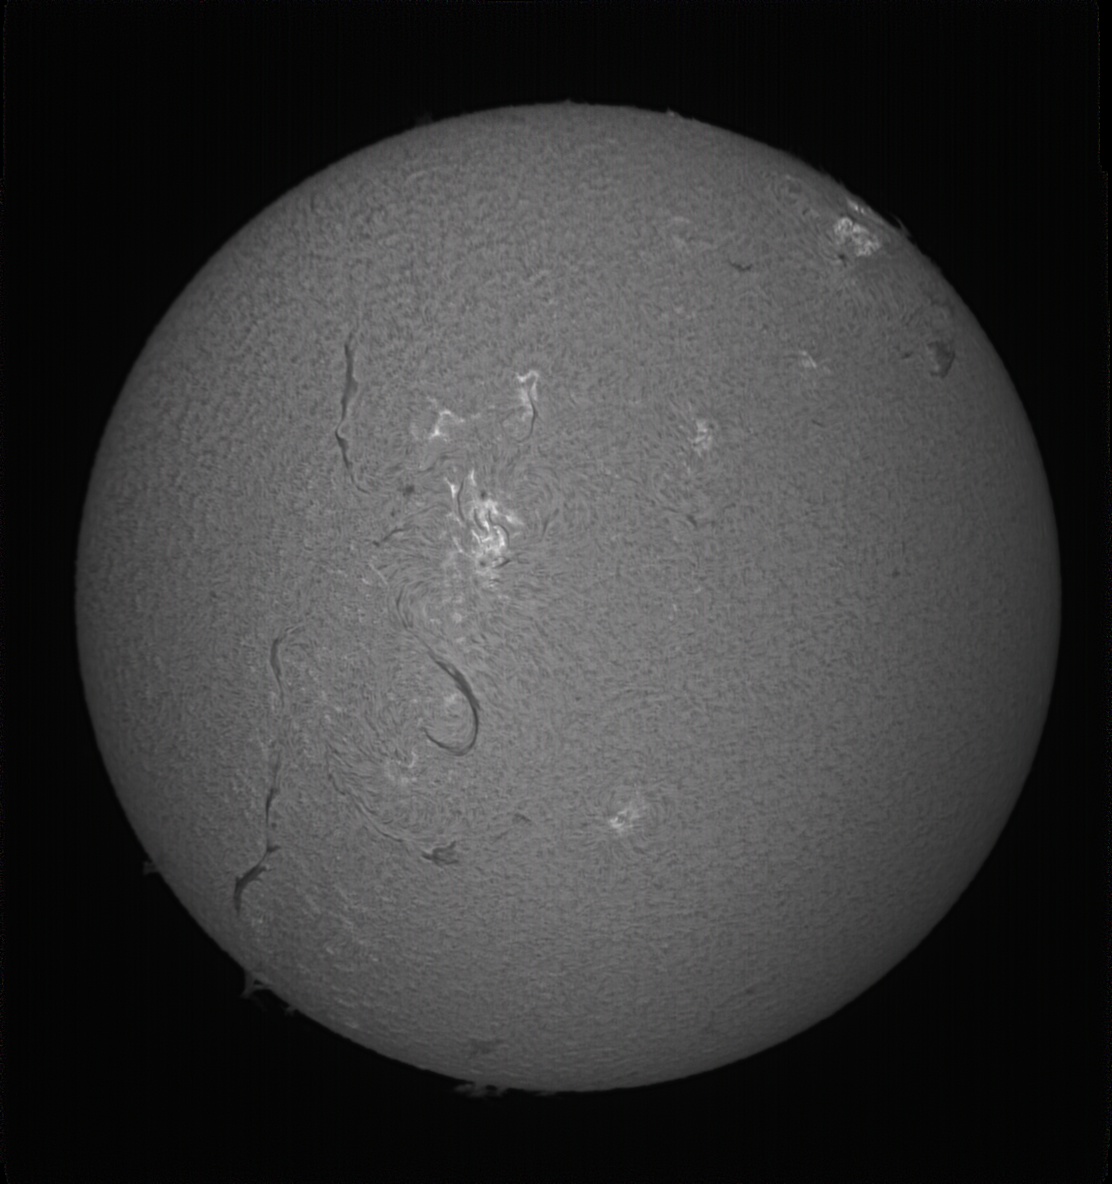
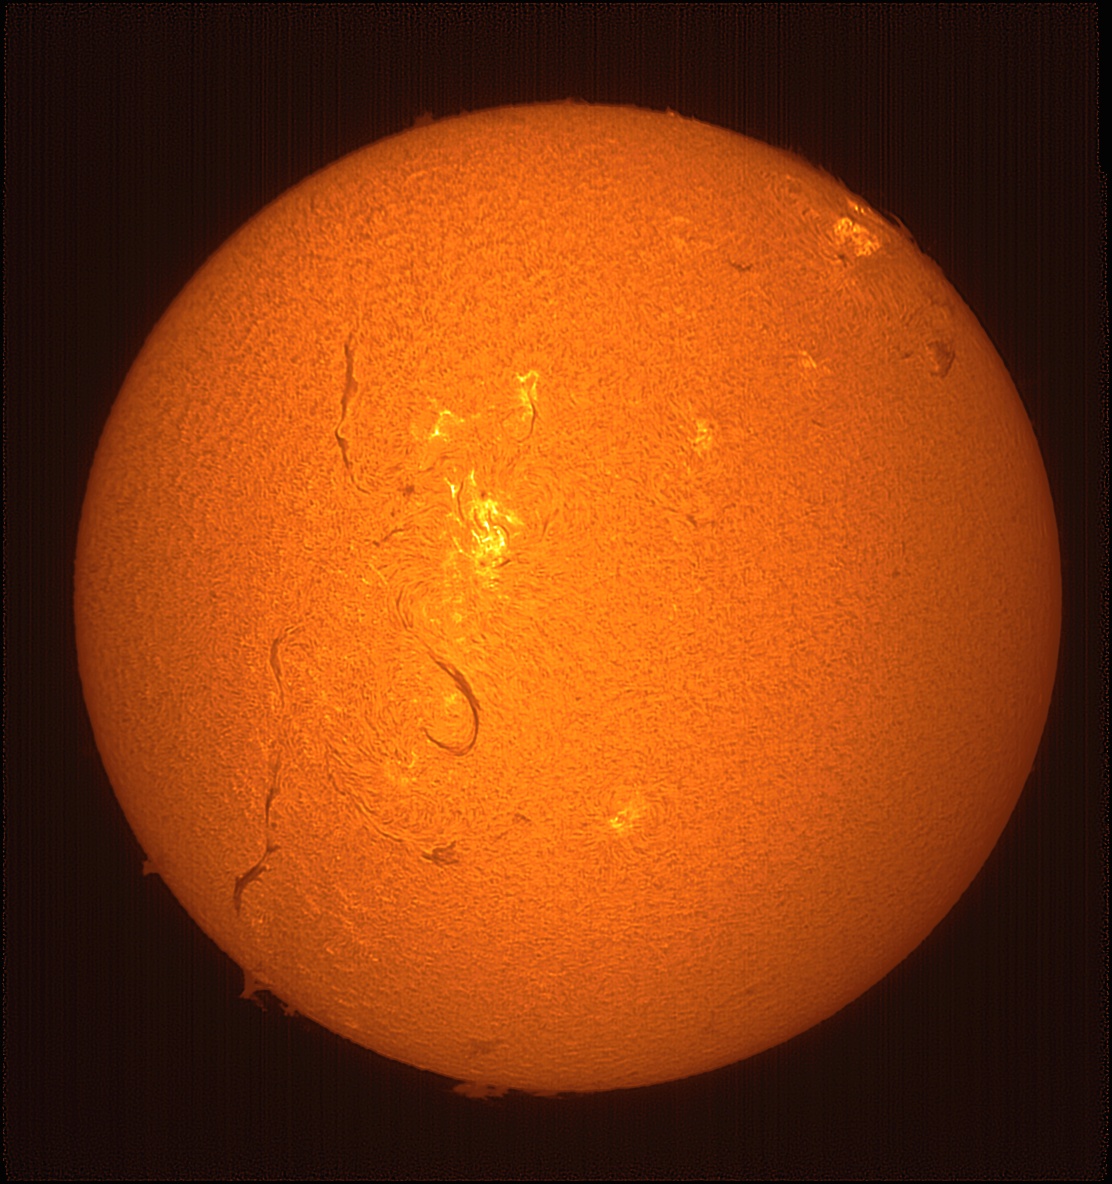
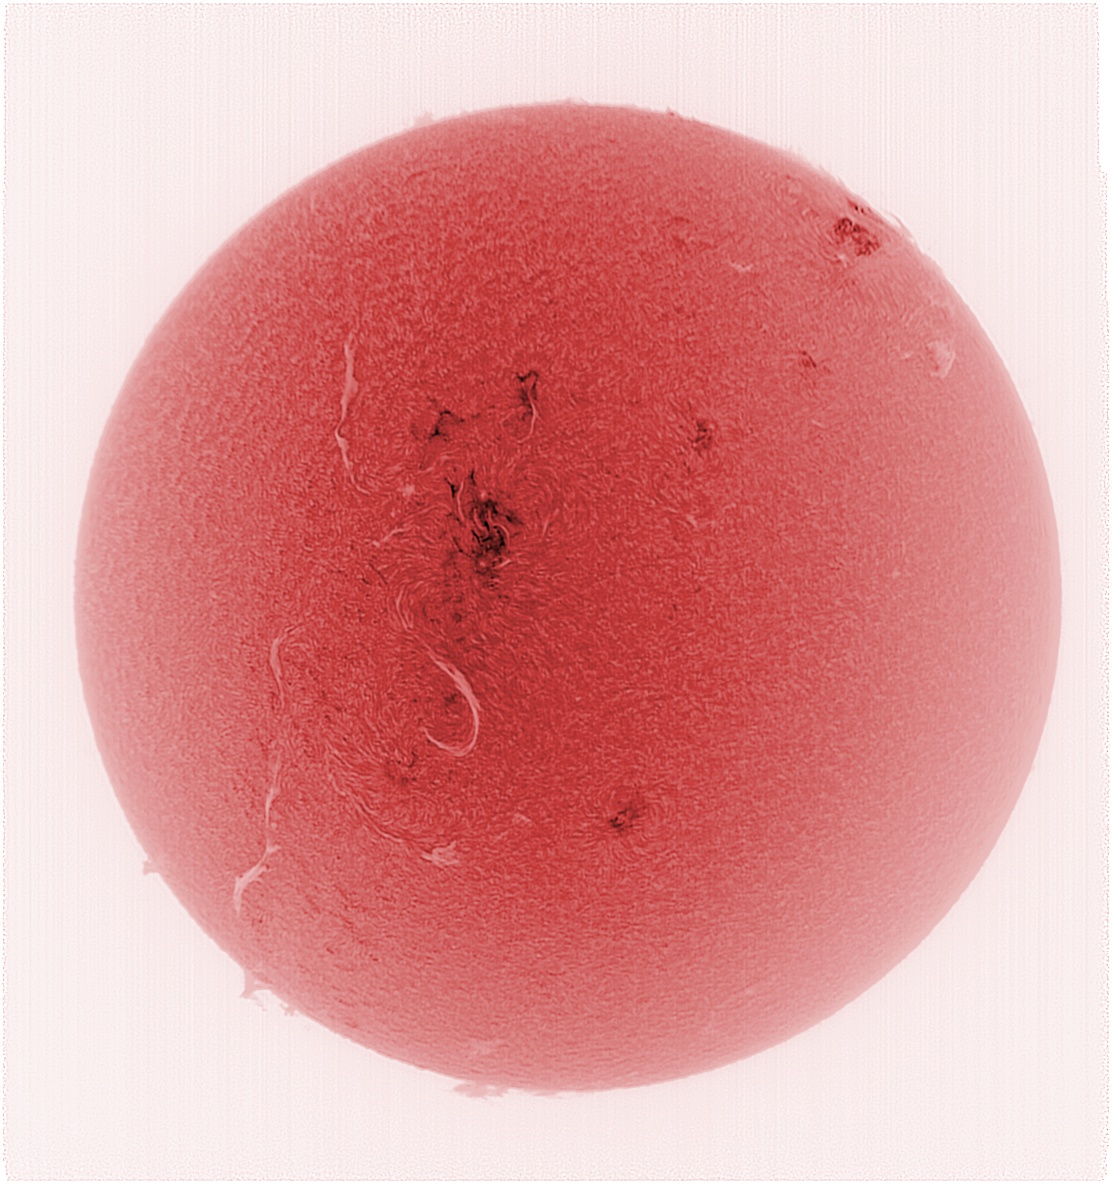
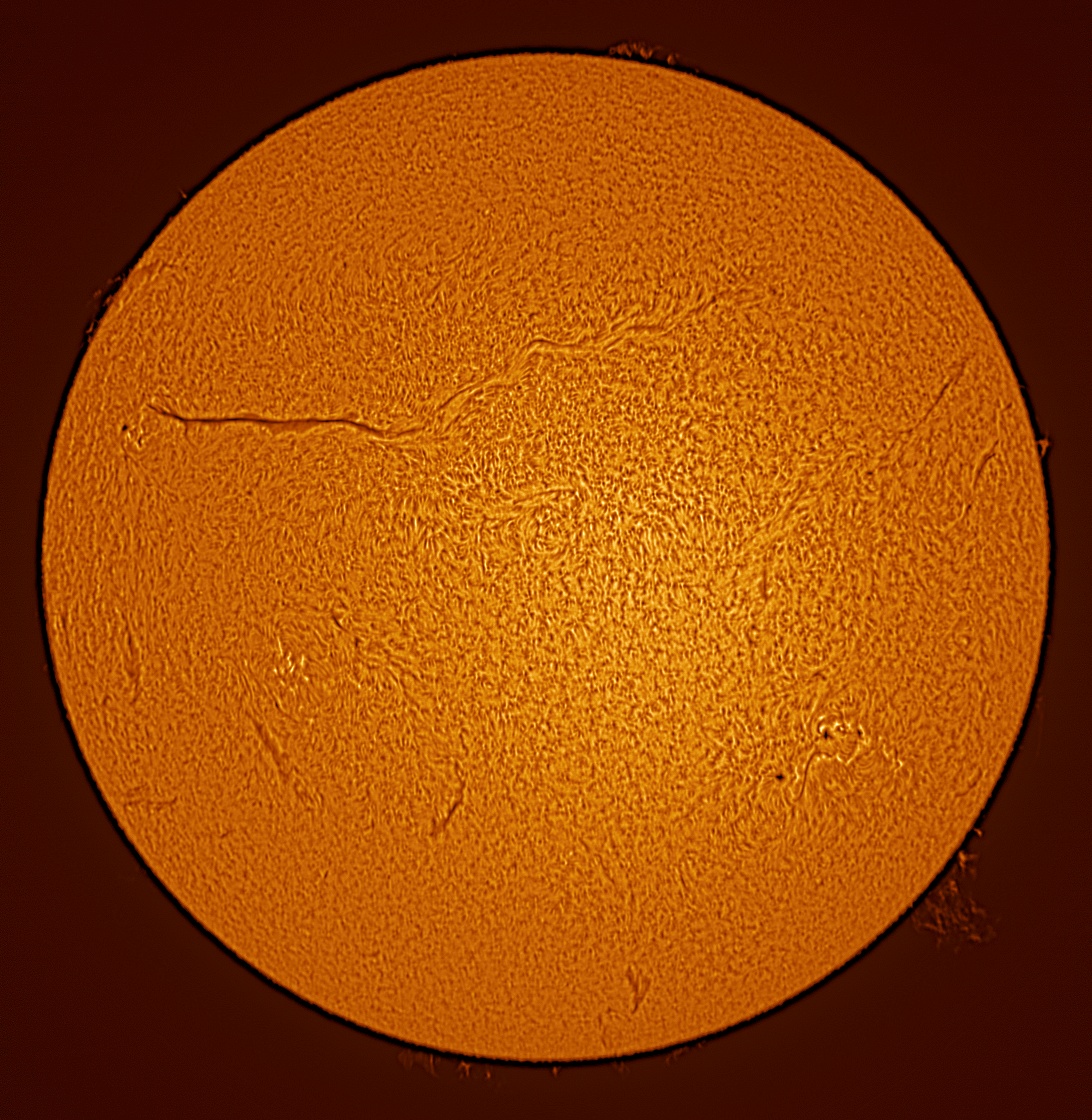
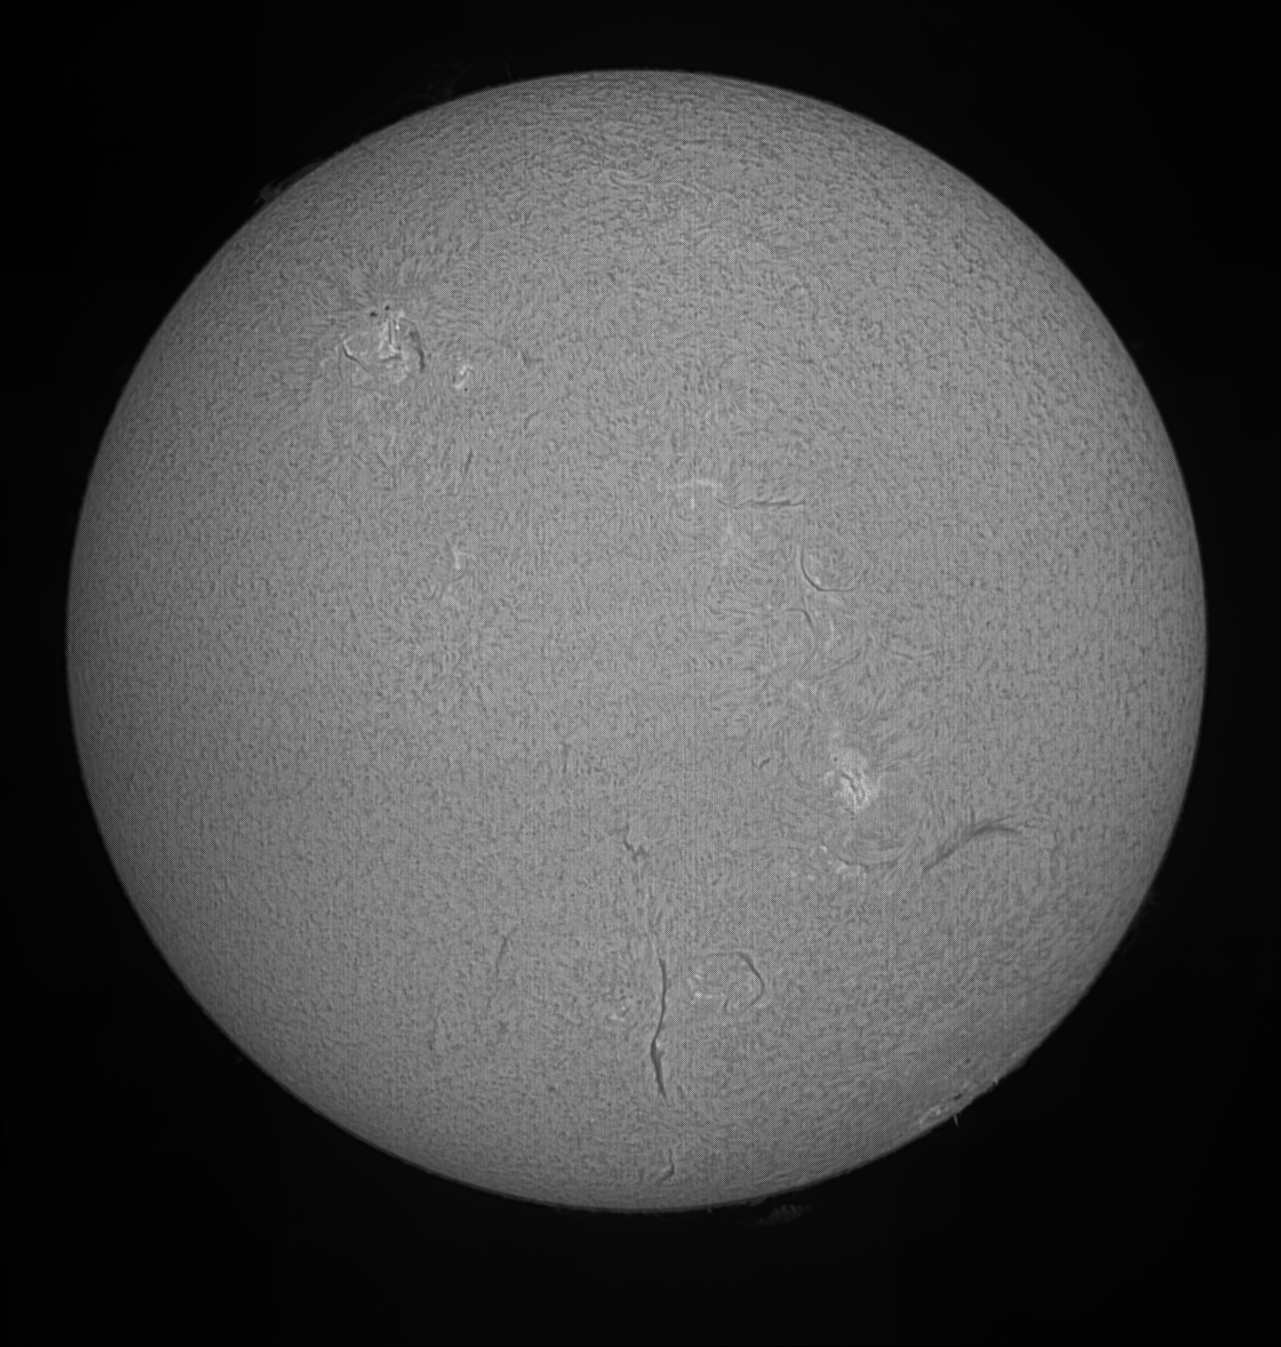
FEB 11, 2015 The second longest structure of the Solar System
A filament of magnetism almost 1,000,000 km long and it is active !!
PST DS, Camera=ZWO ASI120MM-S, 30s movie every
300s done (as all captures here) with Firecapture 16 bit mode in autorun.
First registration done with AS!2 in surface crop mode, each resulting PNG
batch renamed with TotalCommander
and the whole given to RegiStax5 in order
for final alignment and ouytput the final AVI. Fps changed from 300 to 30
with VirtualDub.

PST DS, Processed with RegiStax5, Wx, GIMP2. See that for filaments a PST-DS gives much better results than a PST-1S !!

FireCapture v2.4 beta Settings
------------------------------------
Camera=ZWO ASI120MM-S
Profile=SUNHA
Filename=SUNHA_110215_121212.ser
Duration=240.016s
Frames captured=4001
File type=SER
Binning=no
ROI=1280x960
FPS (avg.)=16
Shutter=60.00ms
Gain=23
SoftwareGain=10 (off)
Gamma=30
Brightness=16
USBTraffic=80
Overclock=30
Histogramm=92%
Limit=240 Seconds
Sensor temperature=19.2 °C
PST 1S, Processed with RegiStax5, Wx, GIMP2. FLAT ... See this page for learning how to make PST Flats !!
FireCapture v2.4 beta Settings
------------------------------------
Camera=ZWO ASI120MM-S
Filename=SUNHA_110215_112542.ser
Duration=240.018s
Frames captured=7426
File type=SER
ROI=1280x960
FPS (avg.)=30
Shutter=25.00ms
Gain=0
Gamma=0
Brightness=16
Overclock=30
USBTraffic=80
Sensor temperature=17.0 °C
Below
live screencapture with PST DS...

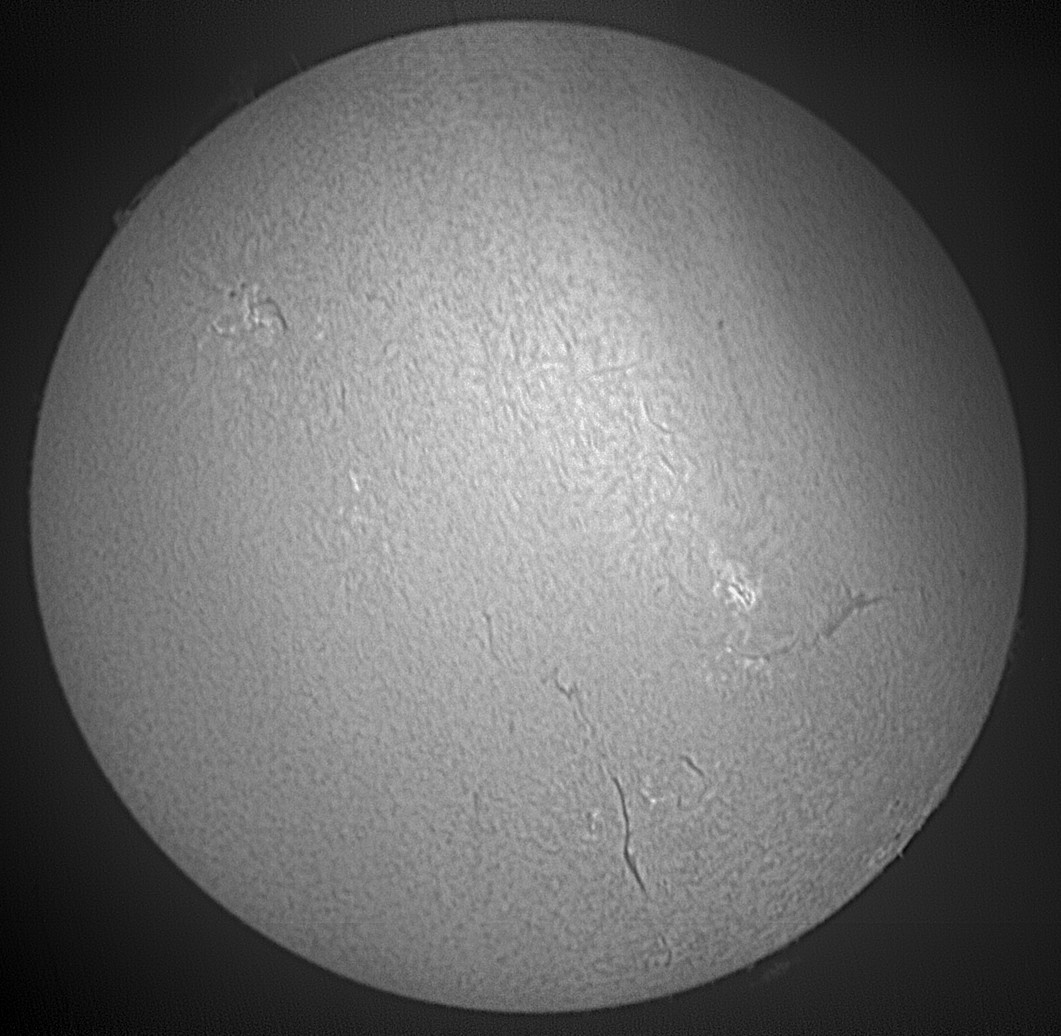
New : FEB 3, 2015 Best today resolution with a higher Sun as captured in Jerusalem (31.7° Lat, a -16° difference) !

PST 1S, ZWO ASI120MM-S camera.
Processed
with AS!2, Wx, GIMP2. I had not a mount good enough to make a full Sun
as good with Registax5 but you can see it here nevertheless...
JAN 14, 2015 Very good resolution despite very very low Sun ! See data.

I had to clean the capture a lot ! See the moves as screen capture (click to download AVI) ...
DEC 9, 2014
Despite rather thick high clouds, already
the best single movie image I ever made at the main focus of a PST ... 2 processing
:


This image is the GIMP2 colorized version of this gray-scale one and is the result of a single 80s .SER 16 bit video in simple stack.
Other version with more wavelets ...
Here are the details :
FireCapture v2.4 beta Settings
------------------------------------
Camera=ZWO ASI120MM-S
Frames captured=2336
File type=SER
[16 bit mode]
Binning=no
FPS (avg.)=29
Shutter=3.000ms
Gain=40
USBTraffic=100
SoftwareGain=100 (off)
Overclock=30
Gamma=50 (off)
Histogramm(min)=2
Histogramm(max)=2883
Histogramm=70%
Sensor temperature=20.0 °C
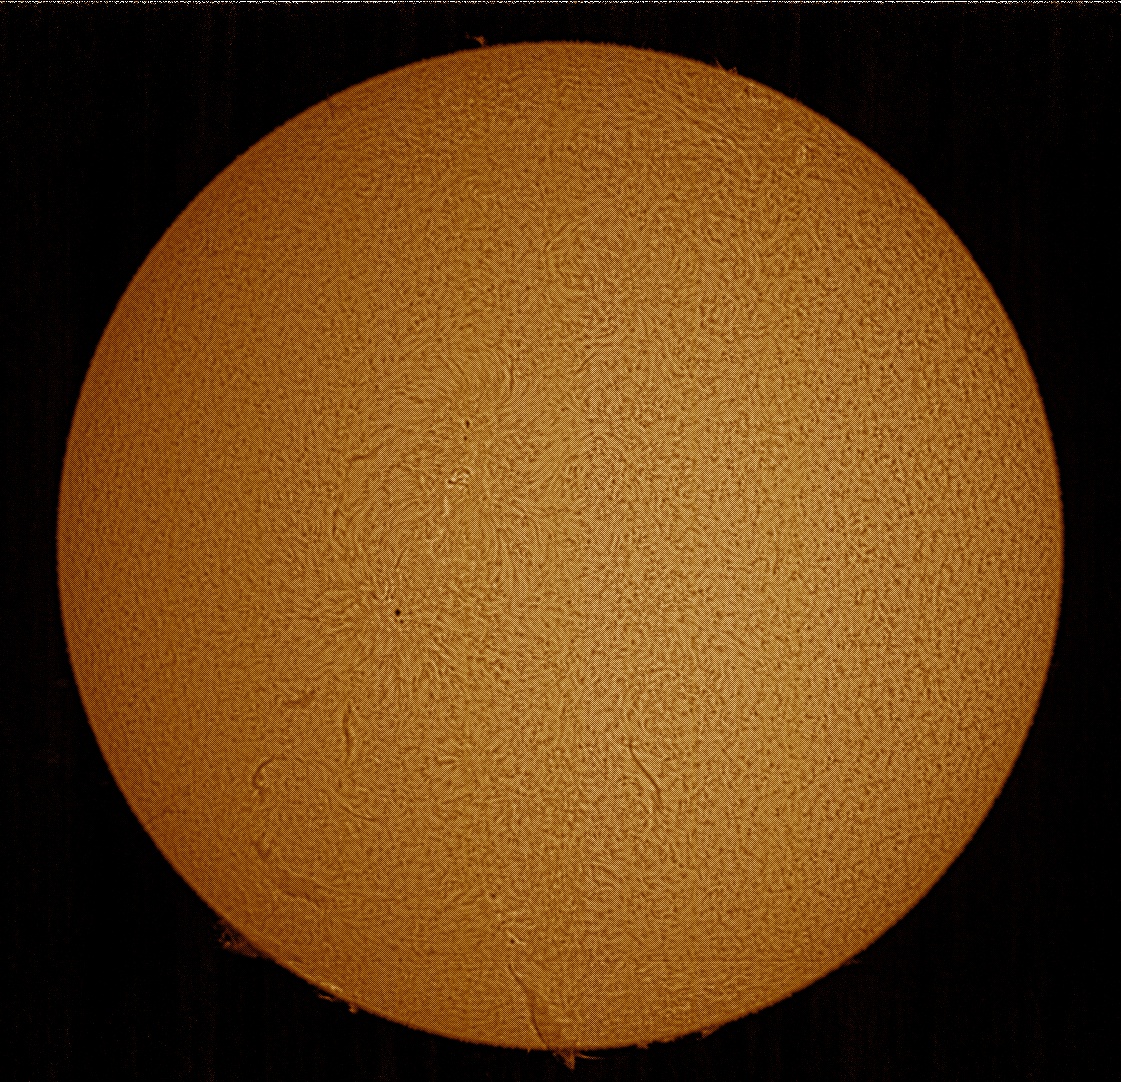
As the Sun disk is larger than the height of the sensor, I made a drifting
movement at slowest speed in AD during the capture
(camera rotated at 90°, AD moves being easier
to reverse than DEC ones)
You can see how in the divx placed here.
The movie was then registered with RegiStax5 with a 256x256 alignment square
placed on a small sunspot near the center (always visible) and
stacked using "expand to maximum
imagesize". This way produce an automatic "mosaic" !
Wavelets and gamma were applied with a new
software (Wx in development) and colorization was in GIMP2 using Map from
another image...
---------------------------------------------------------------------------------------------------------------------------------------------------------
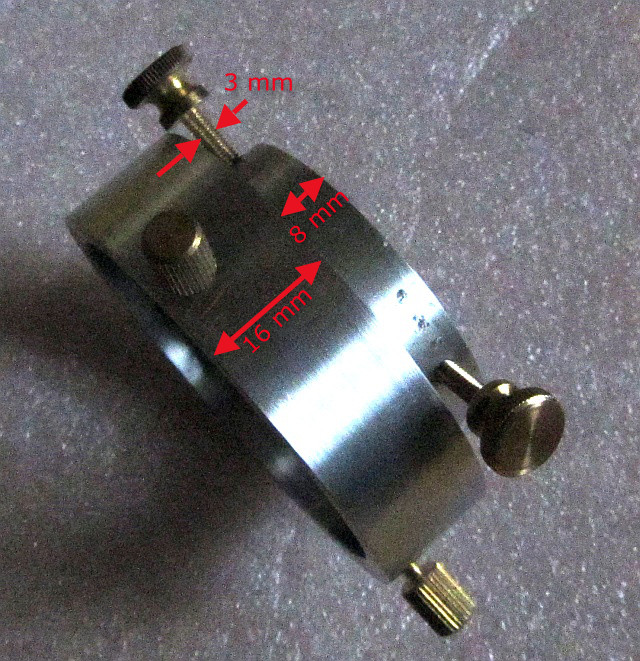
PST - ZWO ASI 120 Dural adapter done by a friend !!
 The
PST black eyepiece holder (screw removed !) is going all the way inside the
adapter until touching the camera body ...
The
PST black eyepiece holder (screw removed !) is going all the way inside the
adapter until touching the camera body ...


13 NOV 2014 New DIY and COMPARO !
Ok, one shot (color) with the Canon EOS has some interest (see way lower in this page) but we know it is far nicer with a B&W camera !
Ok, I do nice one shot picture with the STL11000M (below), my Fluorite 102/900 refractor at ~ FD 14 plus Coronado SM/T 90 and BF30 ...
Of course click on image for full size !
As used resolution : 1.3" / Pixel
 ...but
I am
...but
I am
 ...
looking for a cheaper solution !
...
looking for a cheaper solution !
Moreover with the STL I can download 1 picture per 30s at full resolution or 1 picture per ~10s at bin 2x2 resolution so I doubt the result is free of effects of turbulence !
We know that registering best frames of a video is the way to go but the problem is to get single shots of the the whole solar disk otherwise we have to do mosaics !
Mosaics of 10 fields x 15s are looking great but not easy to do - especially with the PST - and time consuming ...
The sky was lightly cloudy when I did this experiment but I wanted to try today all the tricks I had in mind ...
I will start with the latest one ...
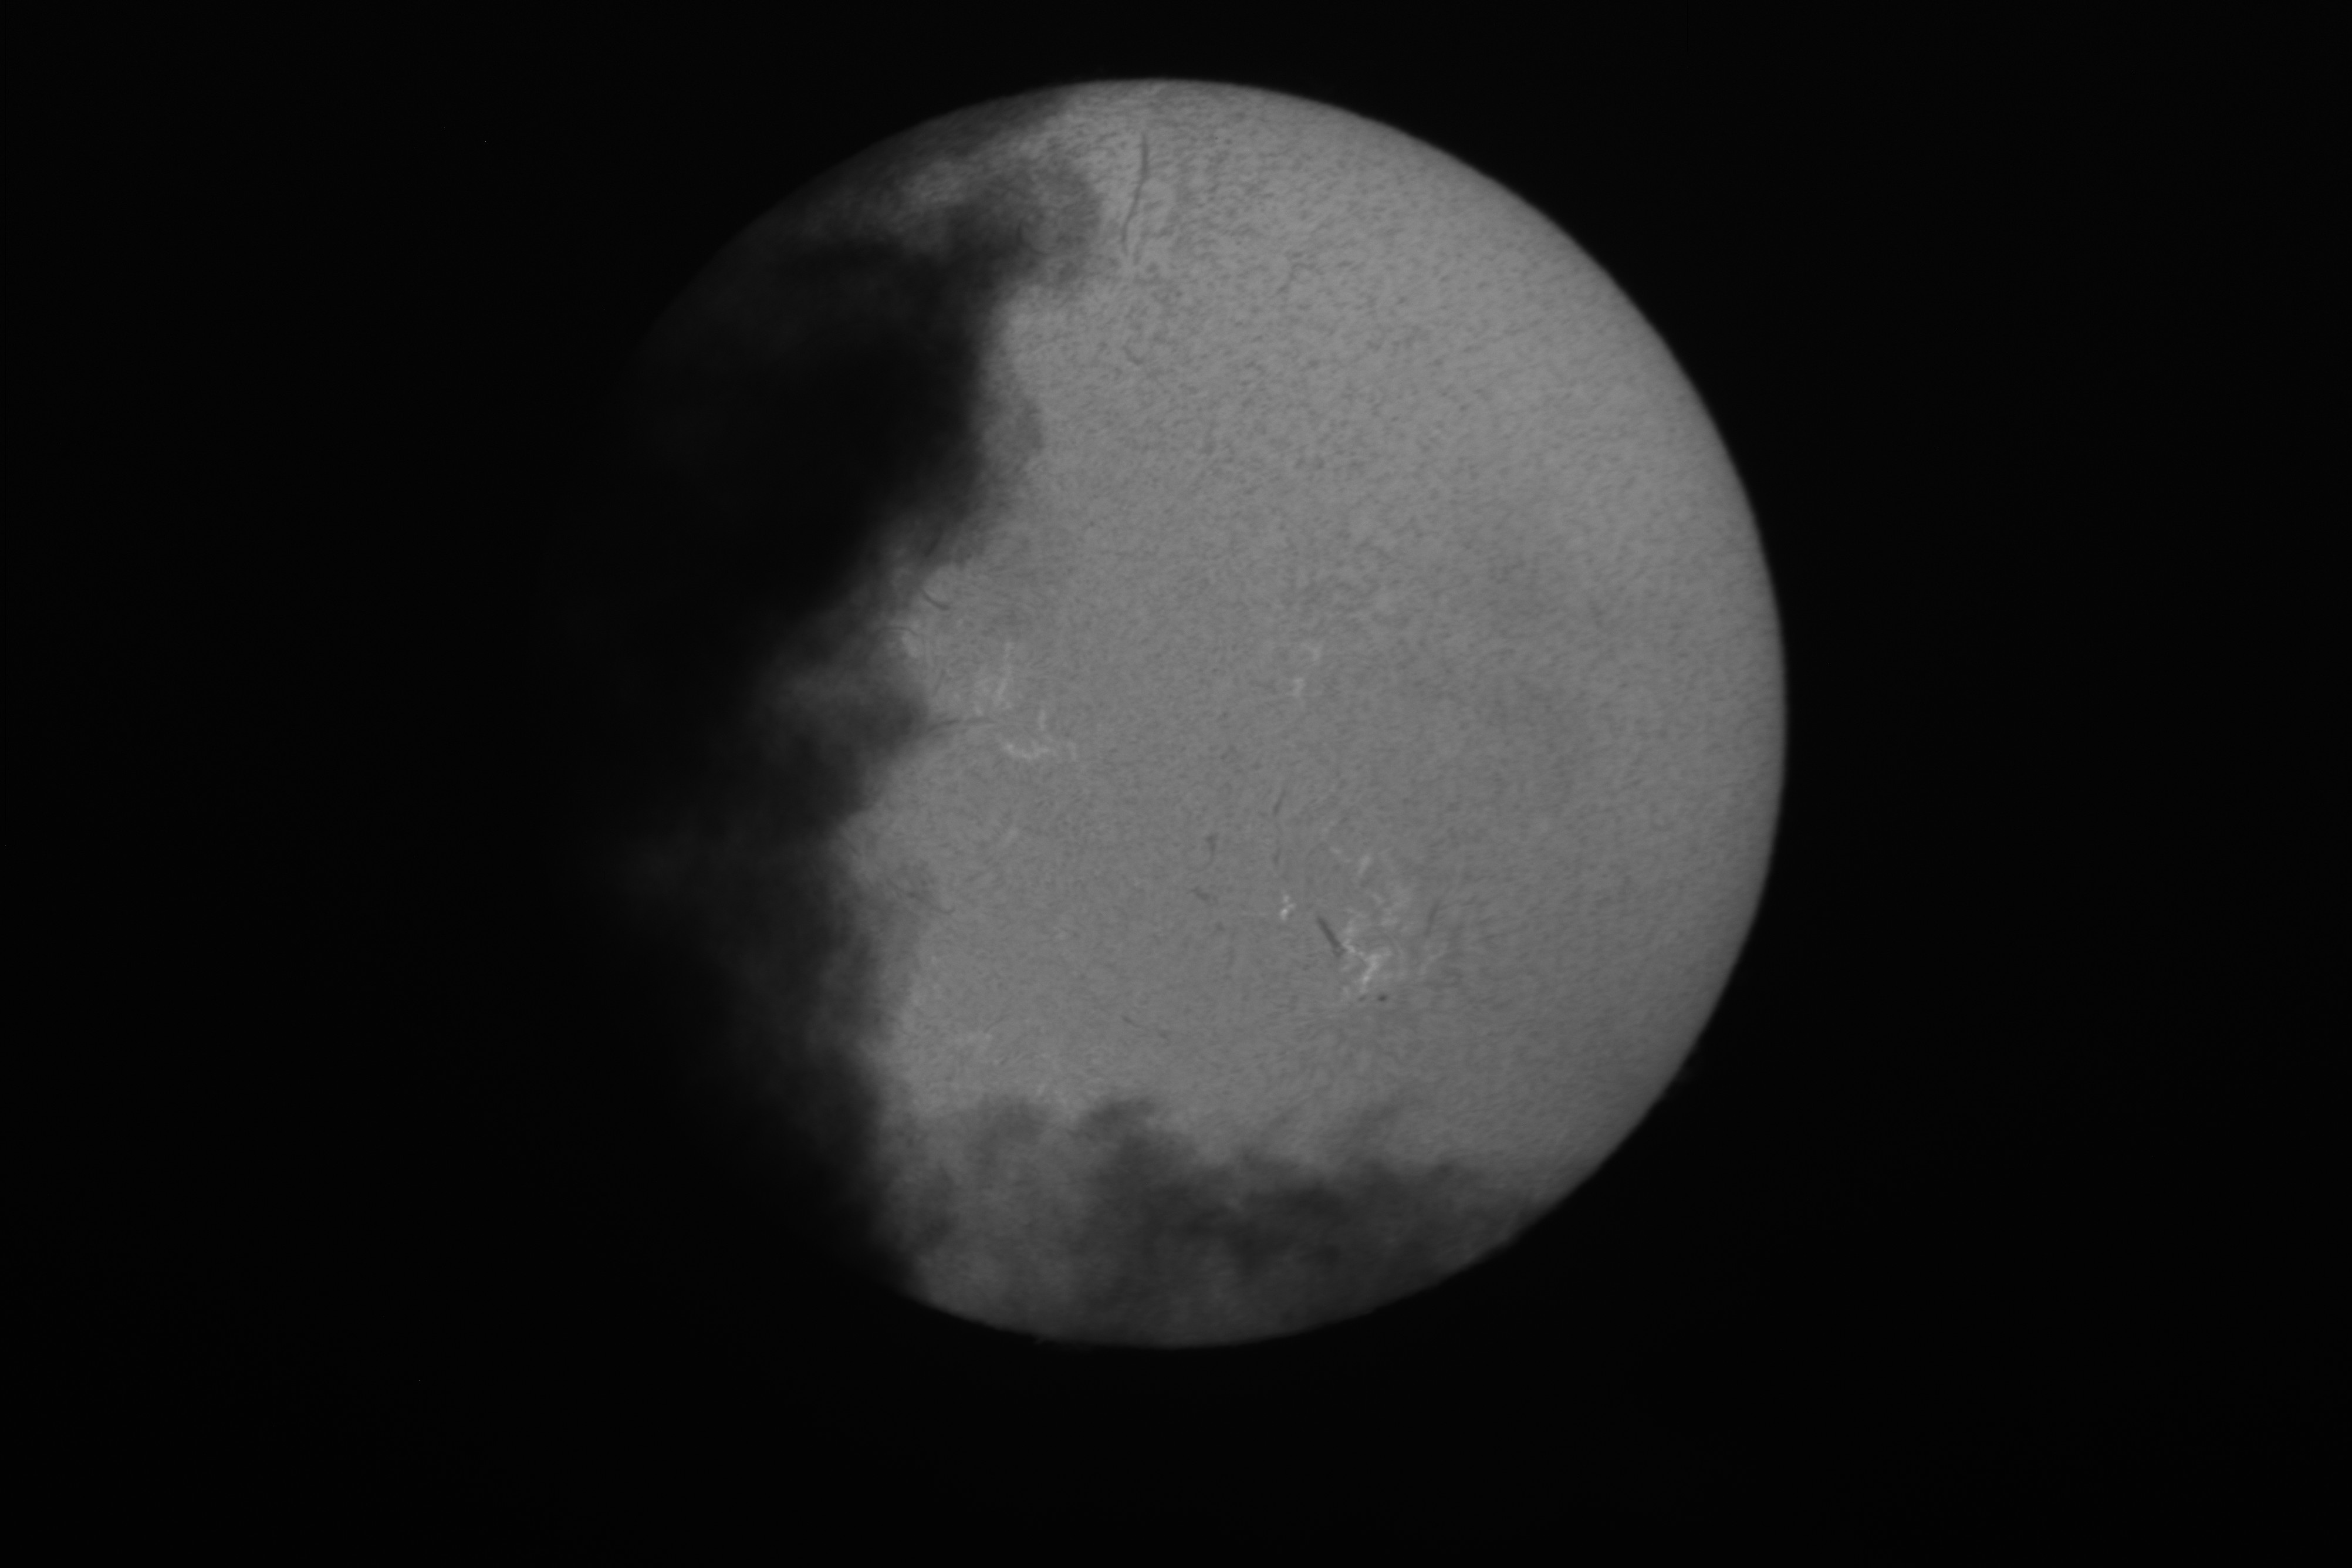
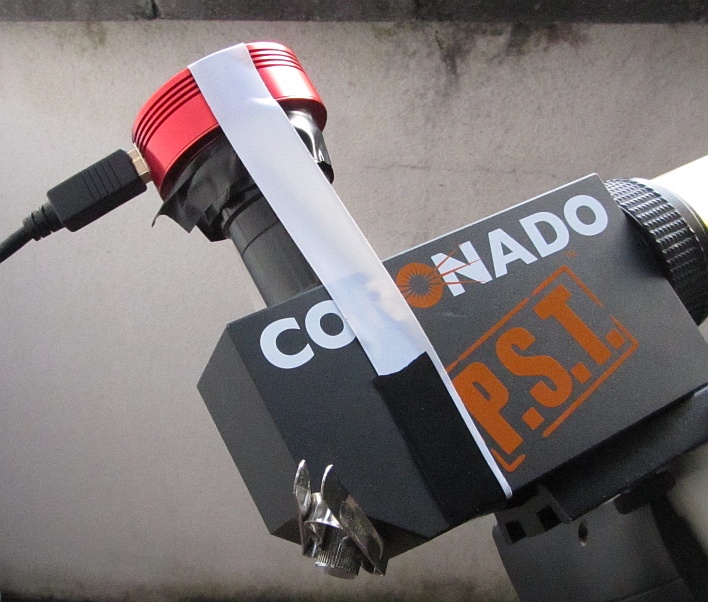
A] Capture with the PST and ZWO ASI-120MMM-S
camera (1/3") and no barlow !
Sensor:
1/3" CMOS AR0130CS(Color) / MT9M034(mono)
1.2Mega Pixels 1280x960
Pixel Size: 3.75µm
Exposure Range: 64µs-1000s
As used resolution : 1.9" / Pixel
The adapter is removed and the camera hold
on the PST without screw ... This permits to have focus easily !
We get most of the Sun Disk !
Black tape is to get rid of spurious light.
Later a metal dedicated adapter will be made.
Discussion : What is the interest compared
with case D as the former gives a better resolution (1.63 " / pixel) ??
Answer : the QHY5 (PL1-M) camera will capture at about 5 - 7 fps only ...
with the ASI120-S we work at 77 fps !!
This will make a huge difference for registration !!
.jpg)
Click on pictures for 100% size ...
As
you can see on the width side there is plenty of room event for very large
prominences. On the height
side a
bit is
missing...
Here, the trick to get all the Sun in one picture without doing a
mosaic is to use this capability of RegiStax (also Autostakkert but not here
- I wont
show
the bad result
:) -
to expand the stack to maximum size.
Then I only had to make slow (tracking speed) ups and downs
during the 60s capture to capture about half of the frames with the top of
the Sun largely visible then same for the bottom ...
In RegiStax5, I choose the filament (could not take something else with the
clouds coming) at the bottom inside a 256 pixel square box and
align.
Here is the resulting registered / stacked picture after wavelets and some processing (gamma, stretch) in RegiStax6 :
Absolutely no problems !! The Sun is looking good, no streaks, no intensity problems ... I am excited to do the same on a next sunny day !
B] Before that the attemps was with a PL1-M
(QHY5) camera (larger sensor 1/2") placed the same.
1.2Mega
Pixels 1280x1024 Pixel Size: 5.2µm Exposure Range: 1ms-5s
As used
resolution : 2.7" / Pixel
The sky was a bit clearer then
I used the PST-DS ...
The Sun sits well in the middle of black space ! Here is the result of a 120 frm AVI processed with RegiStax5 then wavelets in RegiStax6 :

C] Still before that the attemps was with
a PL1-M (QHY5) camera (larger sensor 1/2")
with a short 2x barlow
( PST-SingleStack)
1.2Mega
Pixels 1280x1024 Pixel Size: 5.2µm Exposure Range: 1ms-5s
As
used
resolution : 1.34" / Pixel
The sky was a bit clear
As you can see the Sun does not fit inside the FOV of the camera neither in width nor in height...

I made a mosaïc with Microsoft ICE. Click on image for full size !

D] Still before that the attemps was with
a PL1-M (QHY5) camera (larger sensor 1/2")
with a very short 1.6x Magni-Max
AC555 barlow ( PST-oneS)
1.2Mega
Pixels 1280x1024 Pixel Size: 5.2µm Exposure Range: 1ms-5s
As
used
resolution : 1.68" / Pixel
The sky was almost clear
As you can see the Sun does fit in the width FOV of the camera.

I made two 1 min AVis then after AS!2, a mosaïc with Microsoft ICE. Click on image for full size !
-----------------------------------------------------------------------------------------------------------------------------------------------------------------------------------
-----------------------------------------------------------------------------------------------------------------------------------------------------------------------------------
Adapting a Canon EOS 40D to a PST for whole disk + prominences high resolution images (see example at bottom of page) !
In case you have no access to a lathe to make a dedicated adaptor...
See also Chap. III for webcam adaptation !
At end of page see a reader's comment...
I) My original method with a Meade Barlow Lens :
Material needed :
 |
 |
 |
Lets go !
 |
You have to find the exact model of 2x barlow in 3 pieces (see above) !
All barlows don't work ! Most of them are too thick, I tried many !... you will never reach focus !
We will use only the lens assembly with the black ring on the top... |
 |
Separate the lens assembly (easy !) ... |
 |
Insert some Scotch tape in the 1"1/4 tubing which goes in the T-adapter |
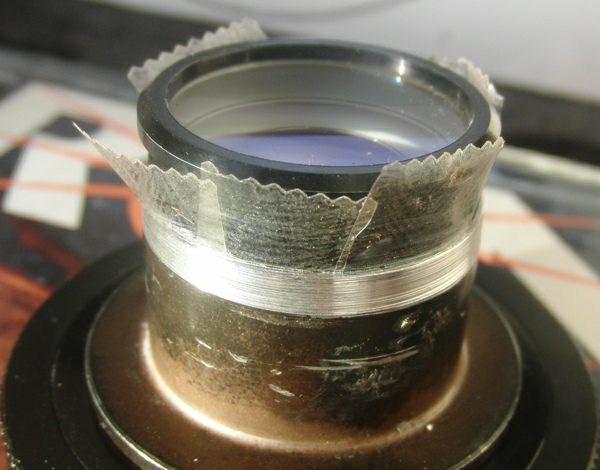 |
Gently insert the lens assembly for a few mm ... |
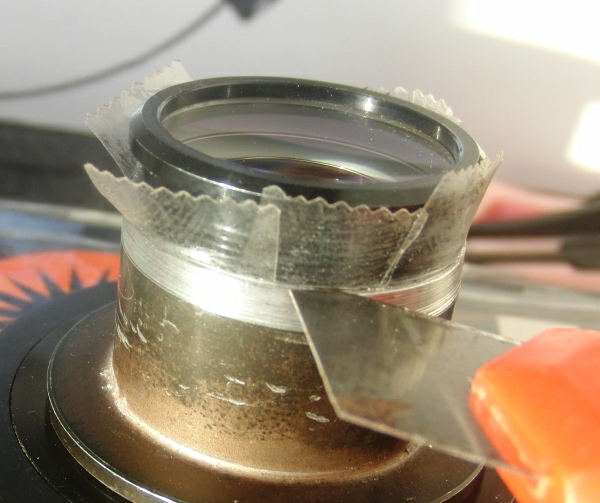 |
Cut the excess of tape... |
 |
Put the adaptor on the EOS. Put the assembly in the PST eyepiece holder. The bottom barlow lens holding should touch the bottom of the eyepiece holder. If not you adaptation is too short ! Now push (via the camera T-ring) the adaptor into the Coronado eyepiece holder until the top of the 1 1/4" tubing is completely inserted ! If you still see some 1 1/4" tubing, you have to shorten it a bit (but not too much ...remember the barlow lens should touch the bottom !) and redo the insertion. If you have still focusing problems, you can eliminate by filing some of the thickness of the top wider ring, mine (seen here in brown-yellow color) is exactly 2.6 mm. In my case the total length after the T-ring is 32.12 mm (see also image below). |
 |
Take the lens-adaptor assembly out and put some nail cream to fix everything ! |
 |
The adaptor is done ! I have even a very very little bit of extra focusing length :) |
 |
The Sun looks like this on the liveview screen... |
 |
Fine focusing at 10X on the rim of the Sun... If I turn all the way out the PST knob, I reach even a very small bit beyond focus ! |
Single image example (but only here jpg quality ... for nicer images, batch-processed with Registax5 go here) :

II) Straitghforward attachement proposed
by Philippe TROUSLARD, France
with a very good Orion Barlow lens :
Note : I seems that a piece of the puzzle was missing ... I am
not 100% sure (please confirm to me via email) but you should install part 1
of the Basic Camera adapter shown below between the usual M42 threaded T-ring
and the bottom of the Shorty plus barlow
(taking the place of part 2) !


and result :

III) Barlow + Webcam + PST
A nicely working set :
FOV and quality (single image) obtained ...


Reader's Comments ...
---------------------------------------------
Michael J Jenkin
Senior Systems Engineer
Hello,
Thankyou for your mod page at http://sweiller.free.fr/ATM/PST-EOS.html
I purchased
a MEADE Series 4000 #126 2x Short-Focus Barlow (1.25") from
ebay and it has a different front element to the one in your images.
It is still
removable and whilst I am still playing, I feel I have gotten focus.
I ended up
cutting my T adaptor back to 20mm and getting a knife and trimming back the threads
and side of the front element assembly of the shortfocus
barlow lens. I found my best results were not to combine the element and T adaptor.
I simply drop the front element into the PST, and then plug in the camera and
T adaptor. The T Adaptor is then just for grip and steadying the camera. It seems
to work well.
I have focus on my Canon 450d but at 10x I can't get focus. I think
this has more to do with how I am doing it and need to use a laptop.
Anyway, it
works well.
Thanks
---------------------------------------------


